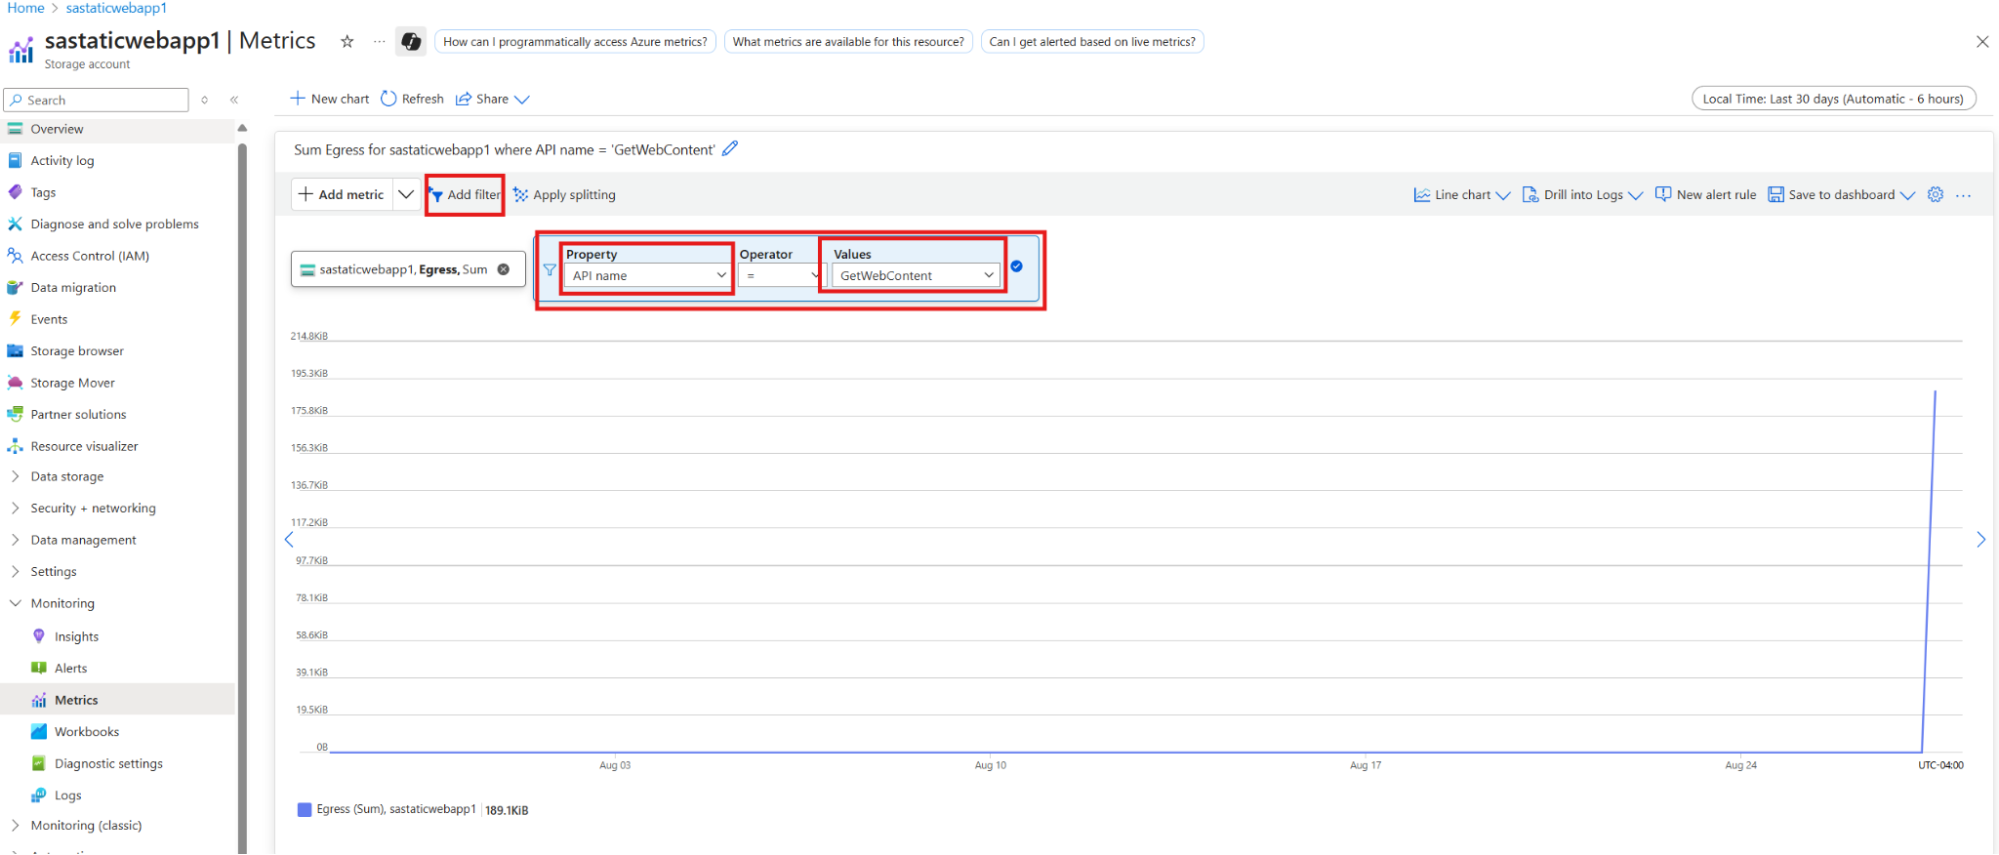
My Portfolio Website View Counts: Cloud-Based API
This project focuses on developing a cloud-based API designed to track and manage website view counts.
Prerequisites:
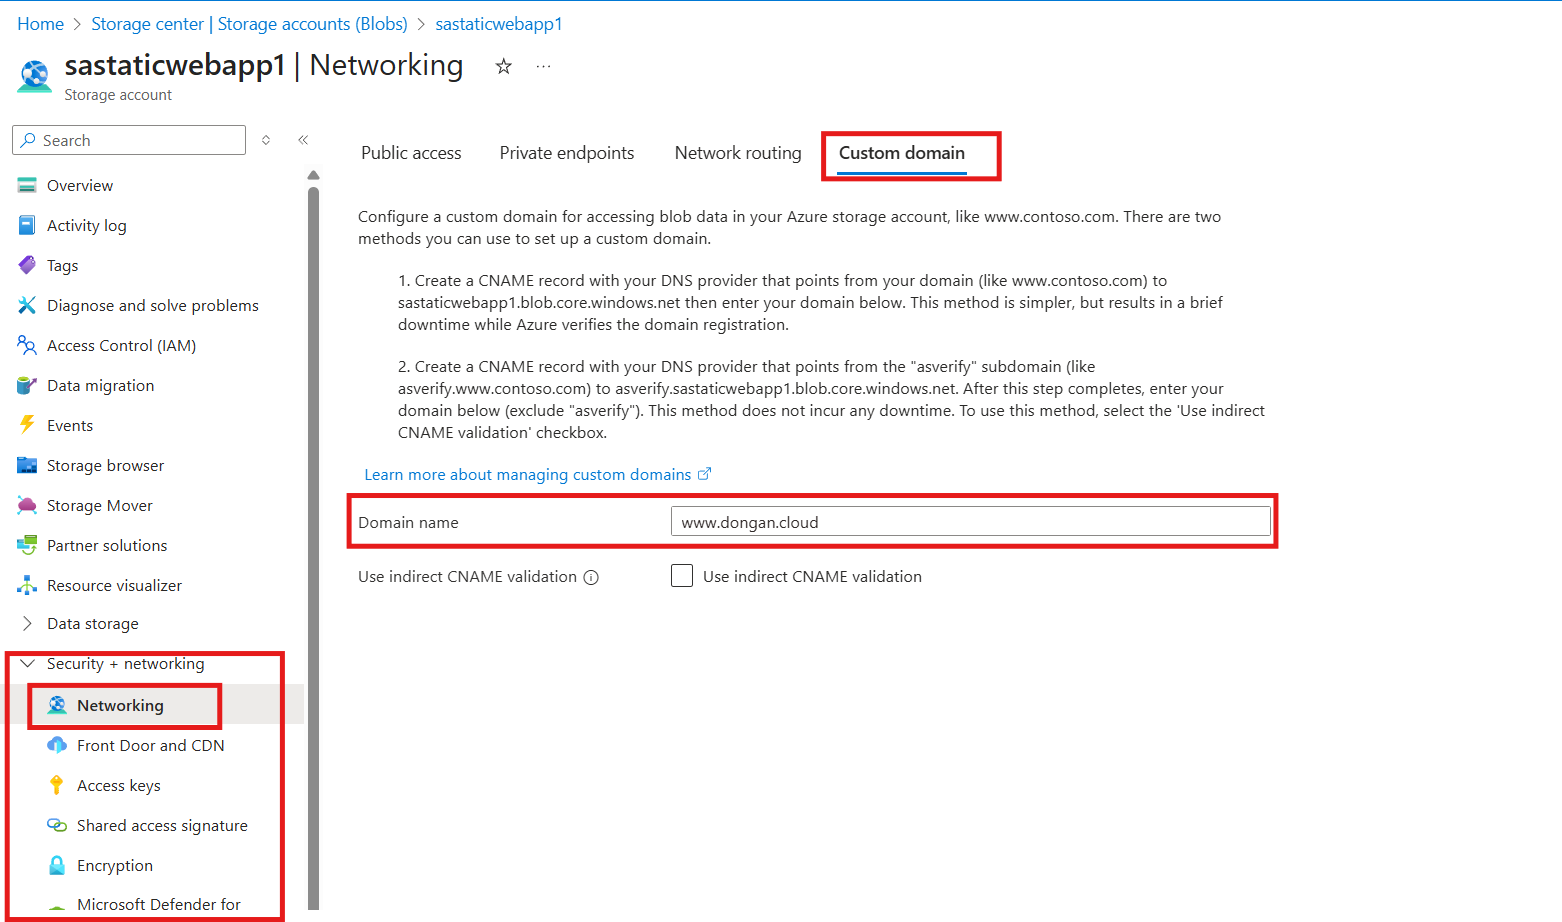
- Get Storage Account Connection String: Go to
sastaticwebapp1 storage account in the Azure portal. In the left menu under Security + networking, click on Access keys. Copy one of the connection strings.
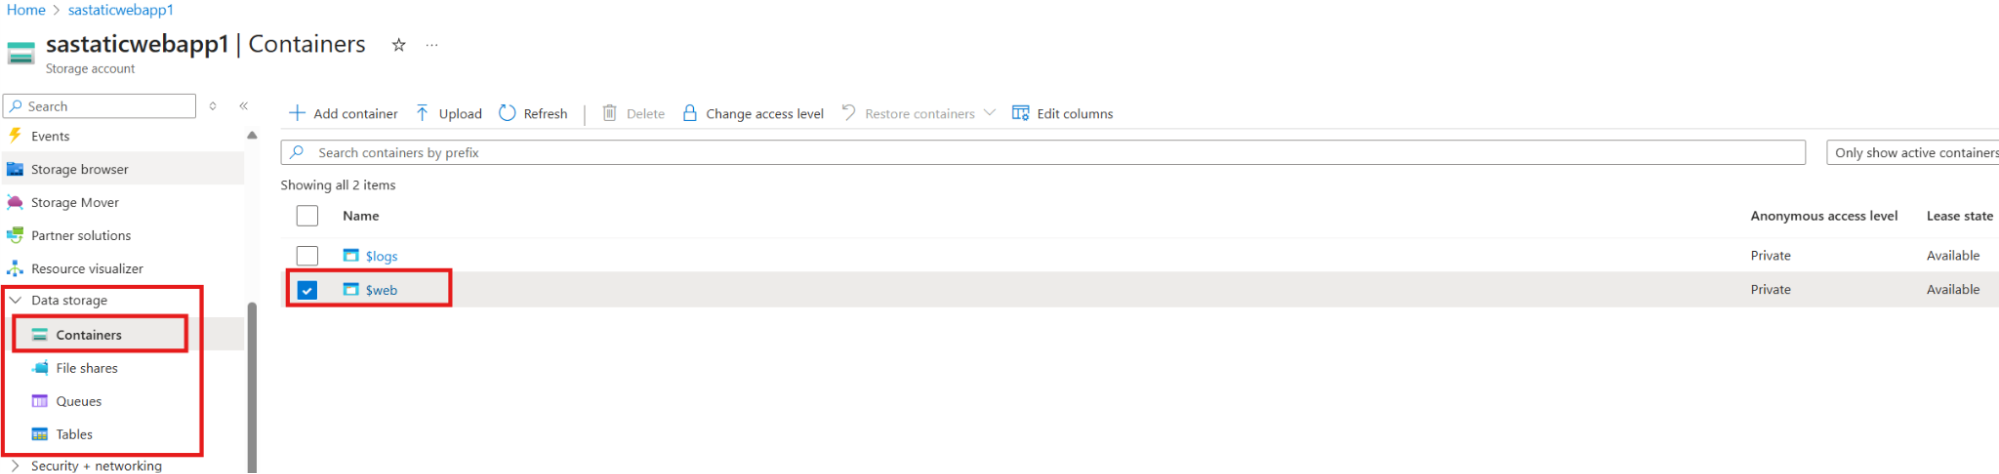
- Create a Table: In that same
sastaticwebapp1 storage account, go to the Storage browser in the left menu. Select Tables, click + Add table, and name the new table counters.
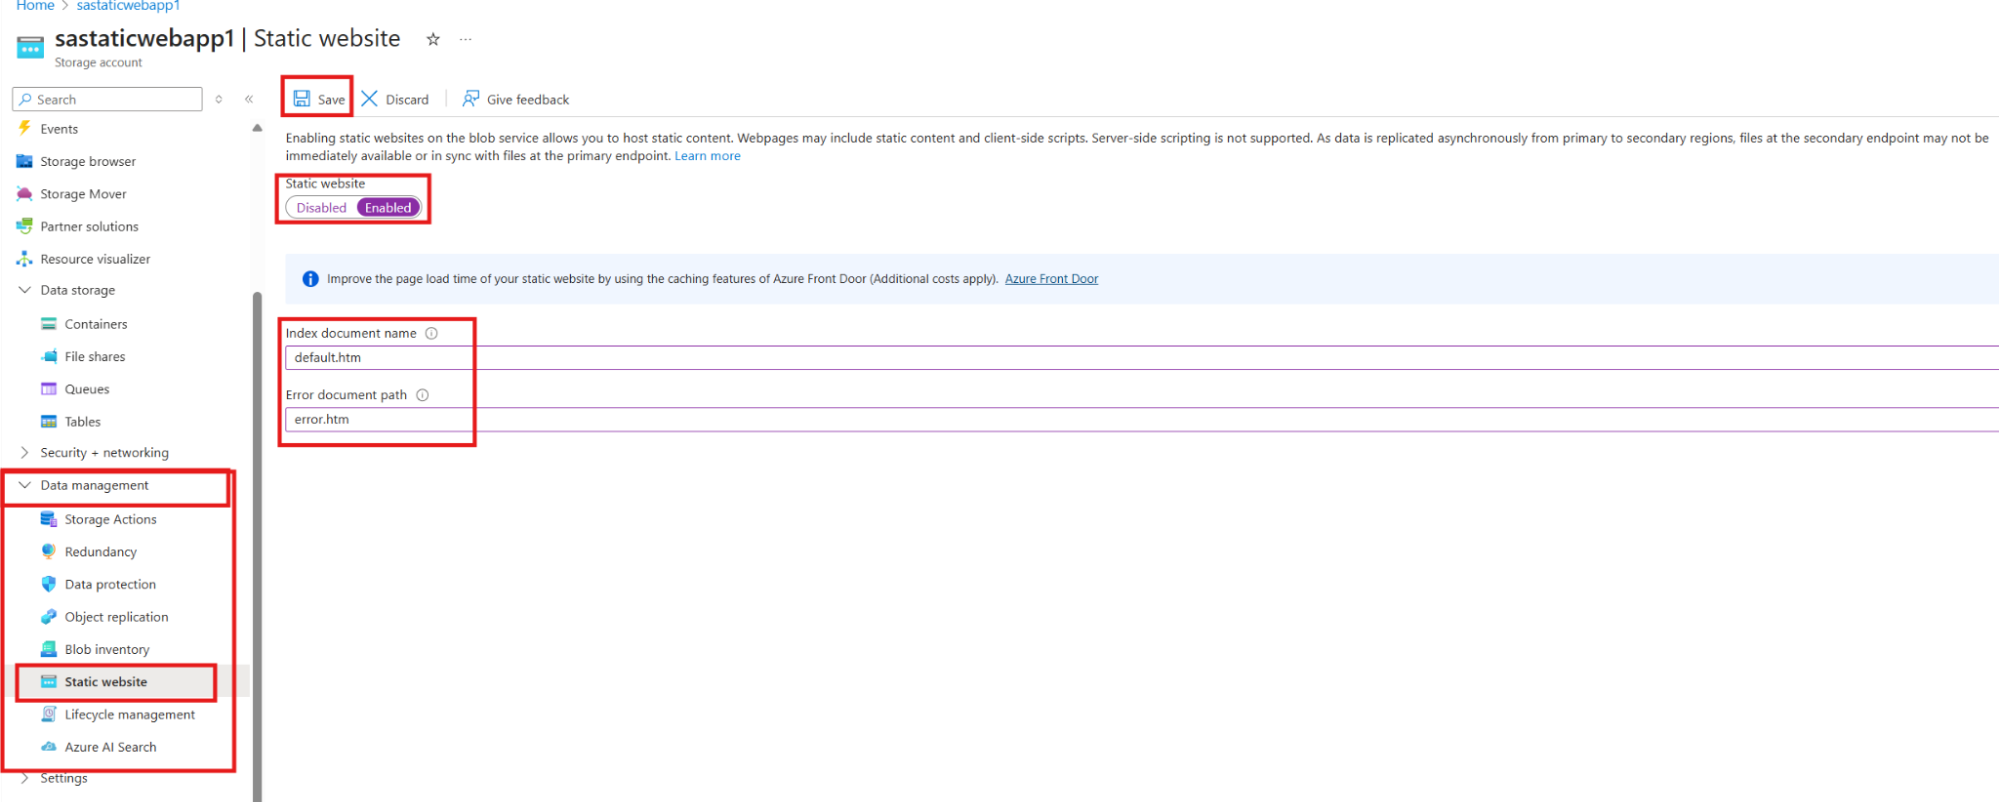
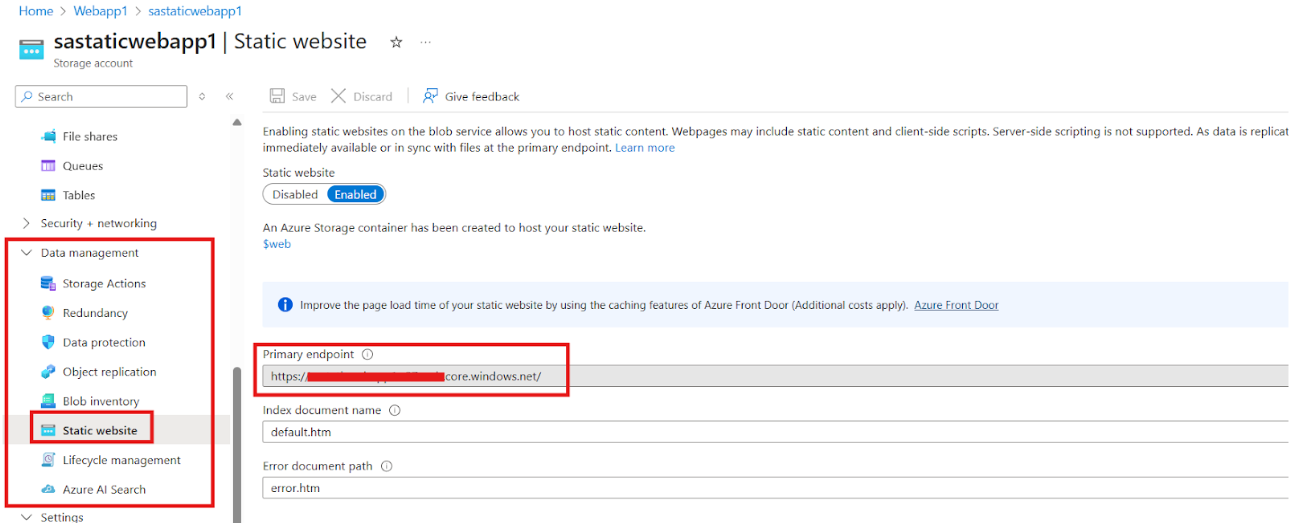
Phase 1: Create The Function App
1.1. Navigate to Function App:
- Sign in to the Azure portal.
- In the top search bar, type "Function App" and select it from the services list.
1.2. Start the Creation Process:
- On the Function App page, click the + Create button.
1.3. For the Hosting plans, I would go for the Consumption plan, because it doesn’t require a VNet and a minimum instance, which is more cost-effective compared to others. The Consumption plan is a purely serverless model. You are only billed for the milliseconds your function runs. If no one visits your website, your function doesn't run, and your cost is $0.

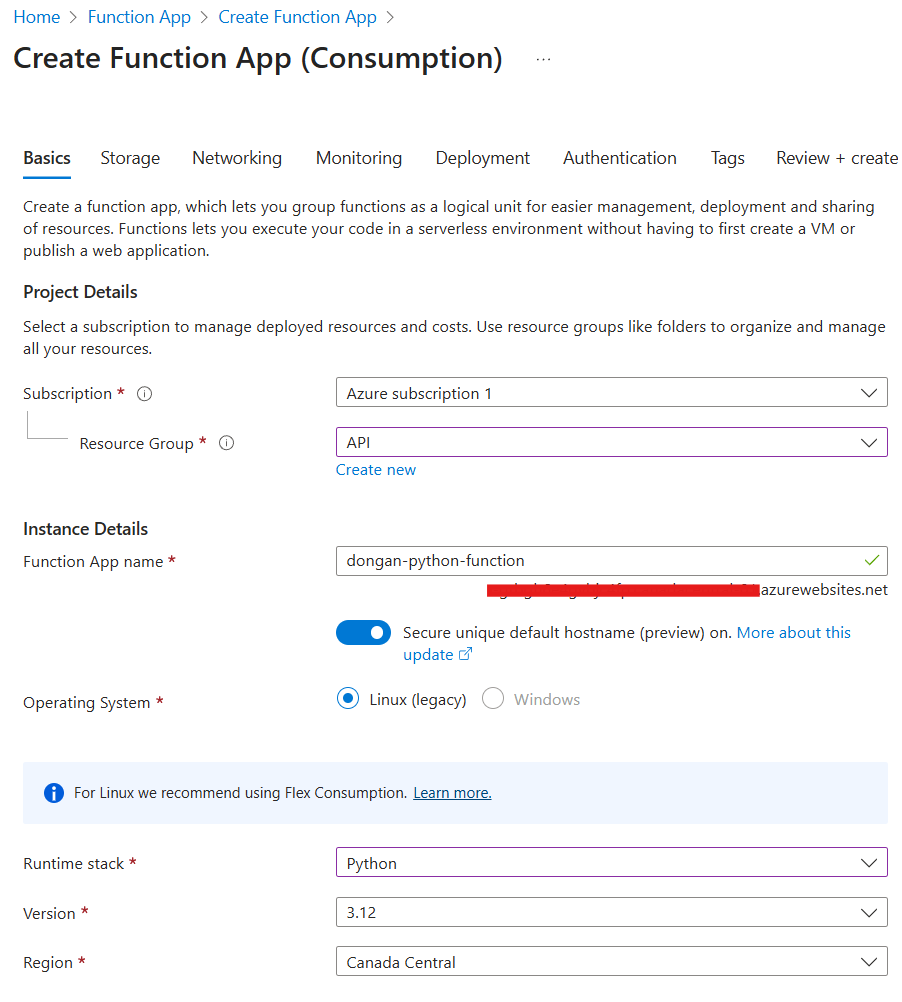
1.4. Configure the "Basics" Tab:
- Subscription & Resource Group: Choose your subscription and a resource group (e.g.,
Webapp1).
- Function App name: This must be globally unique (e.g.,
dongan-python-function). This name will become part of its default URL.
- Operating System: Select Linux. This is the standard for Python functions.
- Runtime stack: Select Python.
- Version: Choose the latest available Python version (e.g., 3.12).
- Region: Select a region close to you.
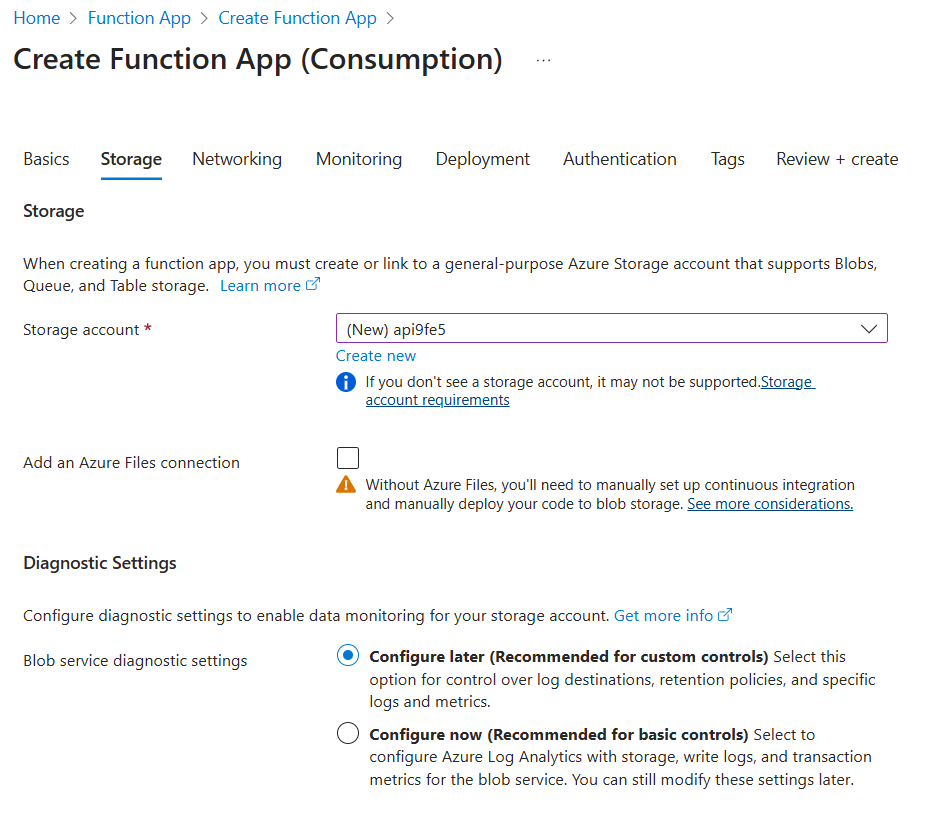
1.5. Configure the "Storage" Tab:
- Select and let Azure create a new one for you. The default name is usually fine. Each Function App needs its own dedicated storage account for optimal performance and to avoid conflicts.
- Uncheck
Add an Azure Files connection(Continuous Integratoin-CI), For a simple HTTP-triggered function, it's not needed and will add unnecessary resources.
- Diagnostic Settings, Select
Configure later (Recommended for custom controls), For a simple view counter, basic logging provided by default is usually sufficient.
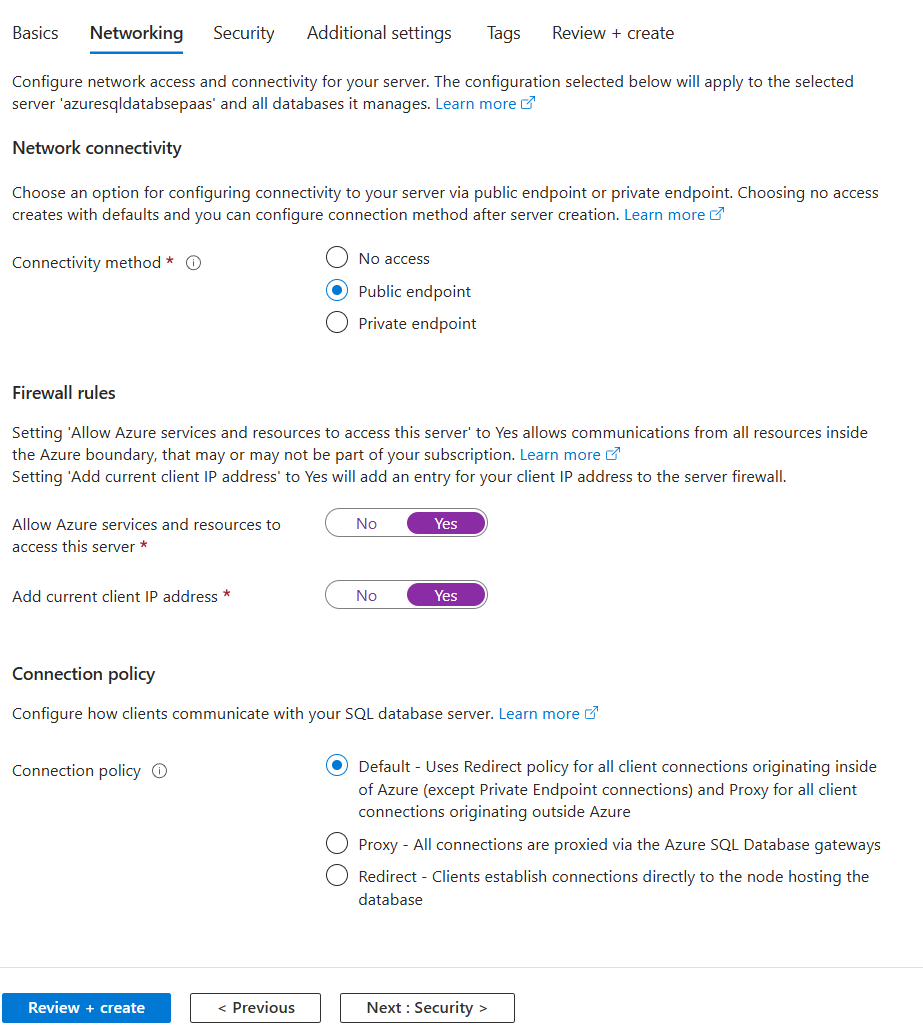
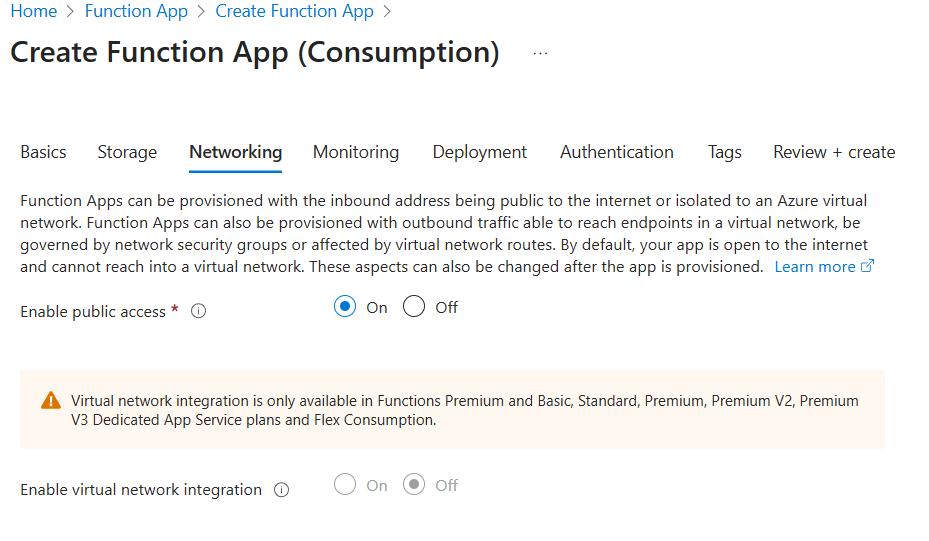
1.6. Configure the "Networking" Tab:
- Enable public access:
On. API needs to be publicly accessible from your website frontend.
- VNet integration:
Off. Virtual Network integration is for securing communication within private networks or connecting to resources that are not publicly exposed. The view counter API will be public, so this isn't needed.
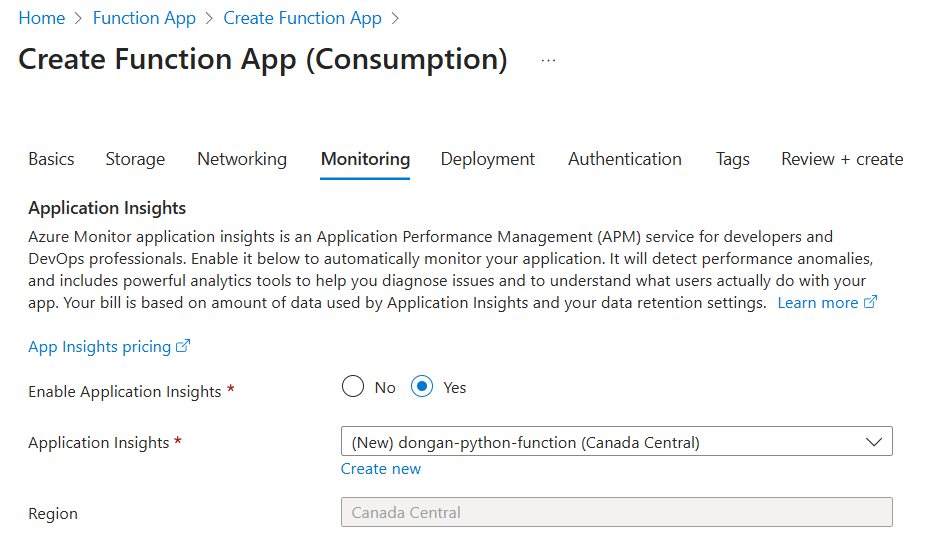
1.7. Configure the "Monitoring" Tab:
- Enable Application Insights:
Yes. Application Insights is for monitoring function executions, errors, and performance.
- Application Insights name: Let Azure create a new one with the default name.
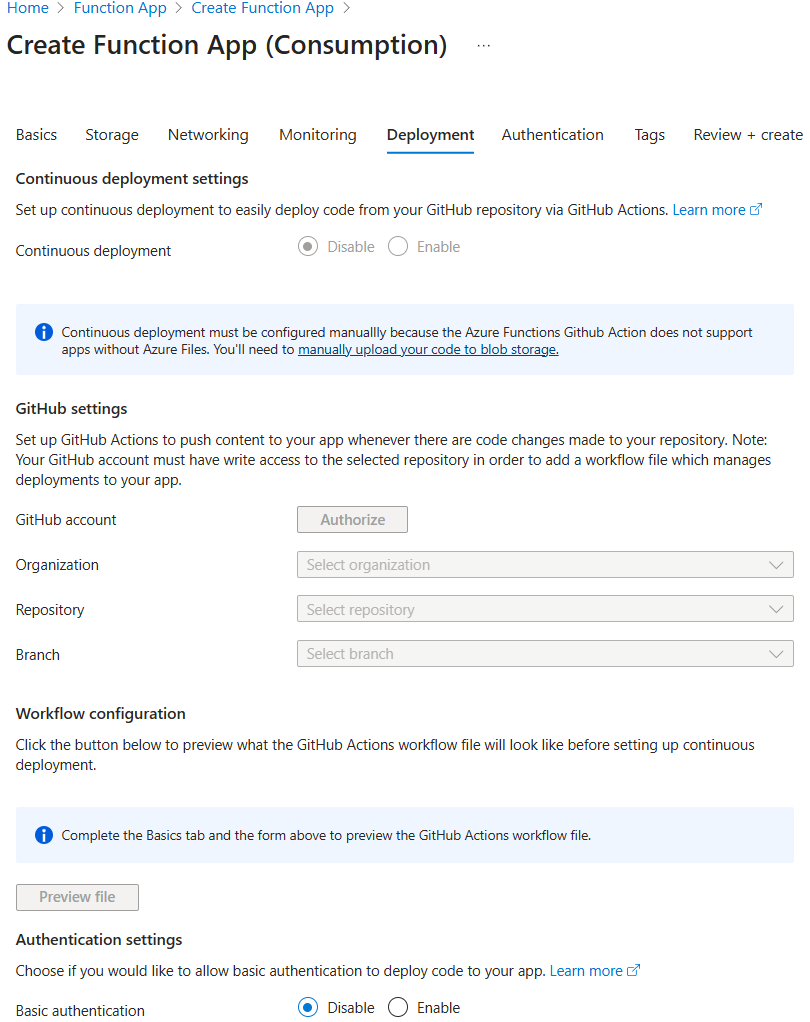
1.8. Configure the "Deployment" Tab:
- Continuous Deployment:
Disable. Since I disabled Azure files, the Continuous deployment(CD) must be configured manuallly because the Azure Functions Github Action does not support apps without Azure Files.
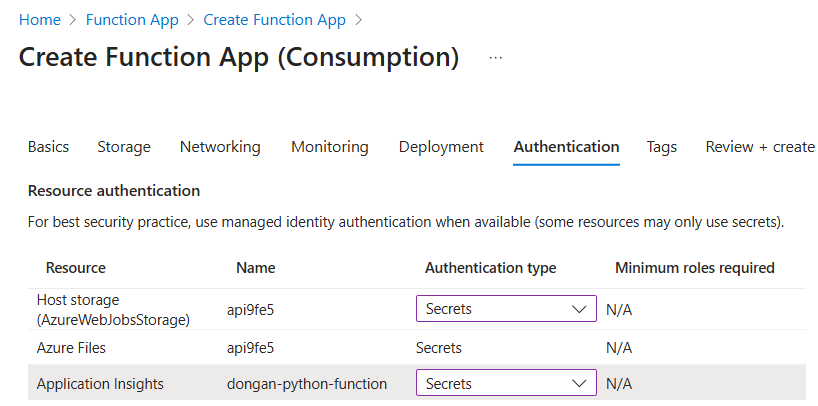
1.9. Configure the "Authentication" Tab:
I would just use secrets. So "Anonymous" authorization for HTTP trigger. This means the API Gateway will protect it at the function level, not the entire Function App. Enabling App-level authentication here would add an unnecessary layer for a publicly accessible counter. I would only consider a user-assigned identity if I planned to create multiple applications that all needed to share the exact same permissions.
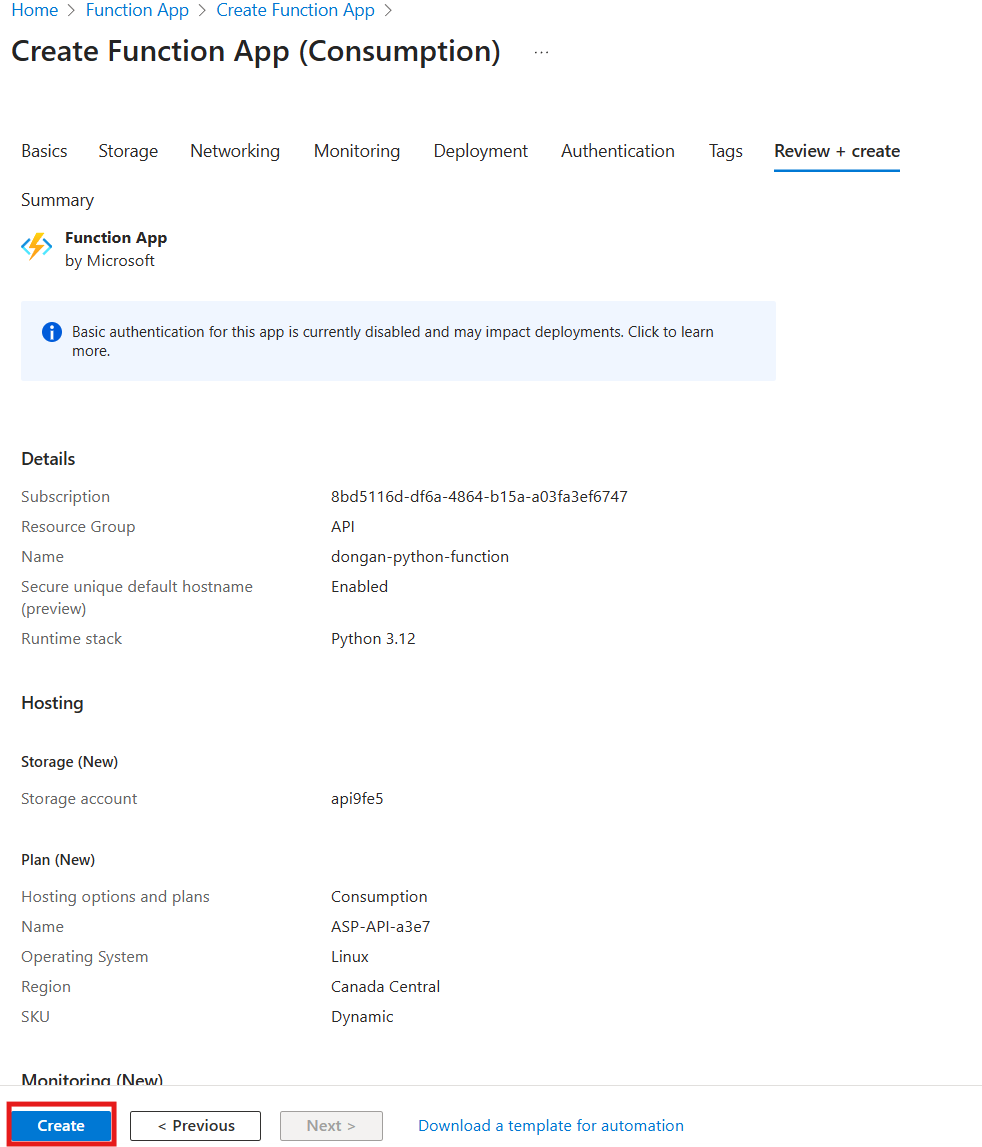
1.10. Review + create Tab:
Click Review + create, then review your settings one last time.
Phase 1.11: Create The Python Function
Develop the function to host the Python code.
1.11.1 Go to Function App:
- Once the deployment is complete, navigate to newly created Function App.
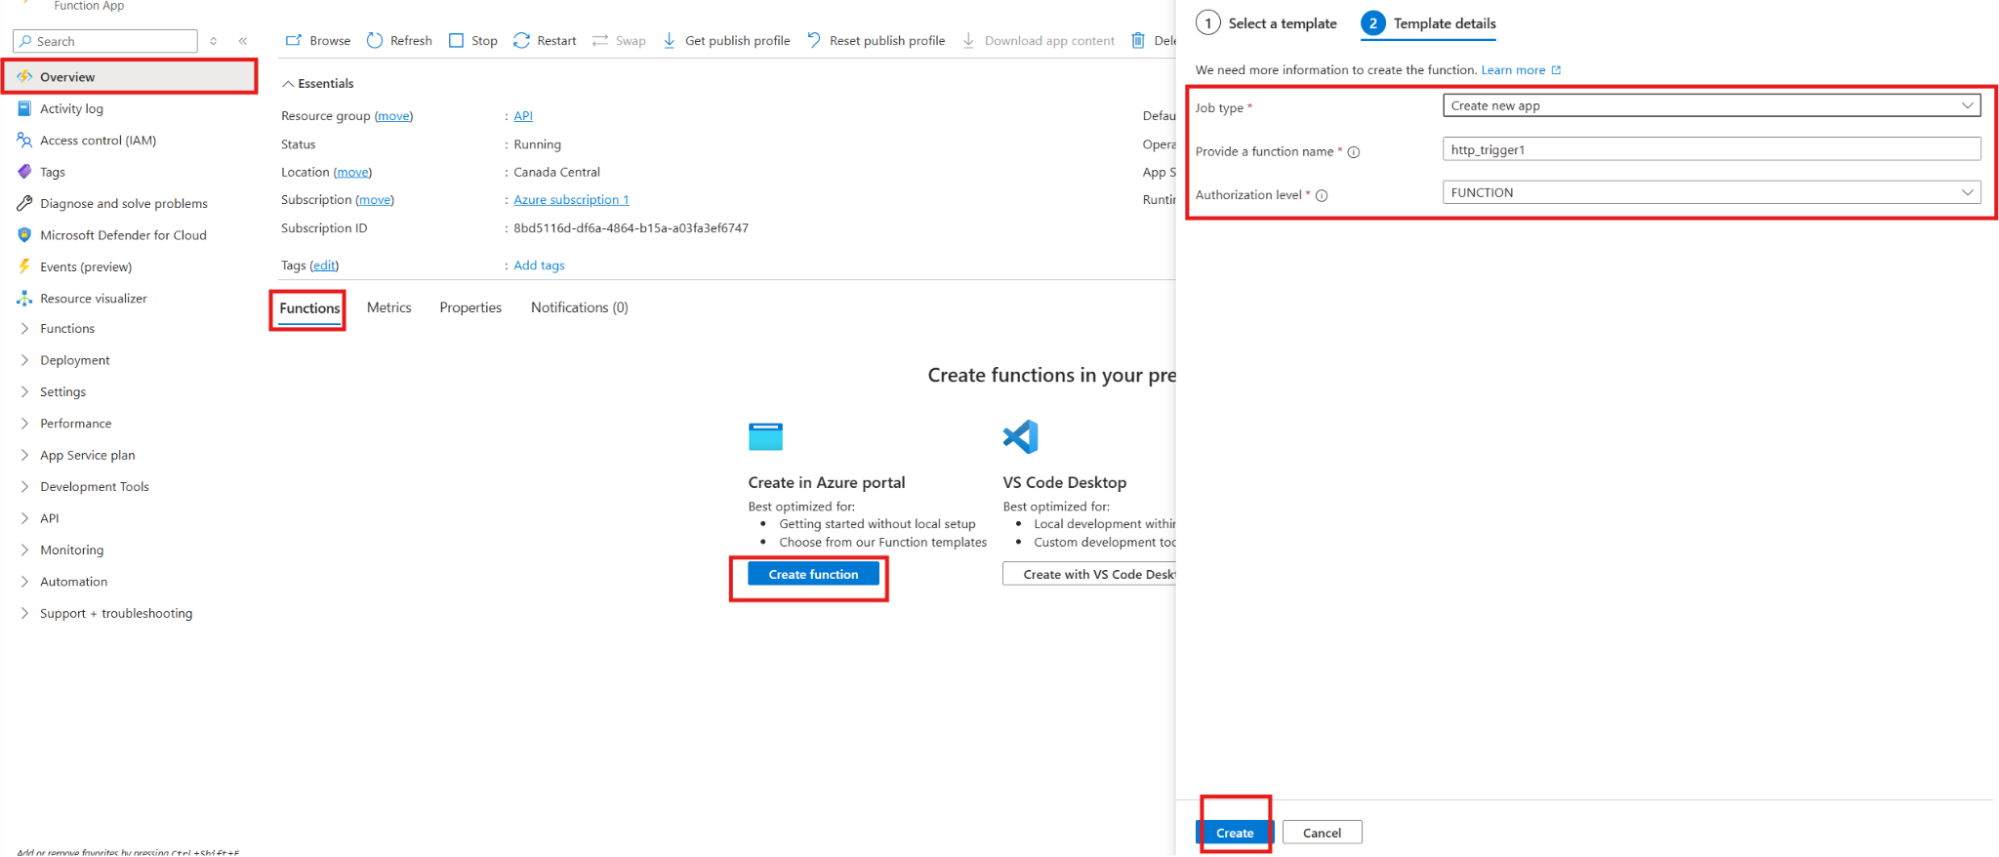
1.11.2 Go to the Functions Blade:
- In the left-hand menu of Function App, click on Functions.
1.11.3 Create a New Function:
- Click the + Create button.
- Select HTTP trigger template. This creates a function that can be run by making a web request.
- New Function name: Give your function a name. This name will be part of its URL
- Authorization level: Choose Anonymous for easy testing. This means anyone with the link can run it. For real applications, you would choose "Function" or "Admin" for security.
- Click Create.
1.11.4 Add and Test the Initial Code:
The function currently contains placeholder code. This will be replaced with a simple script to confirm functionality before connecting to the database.
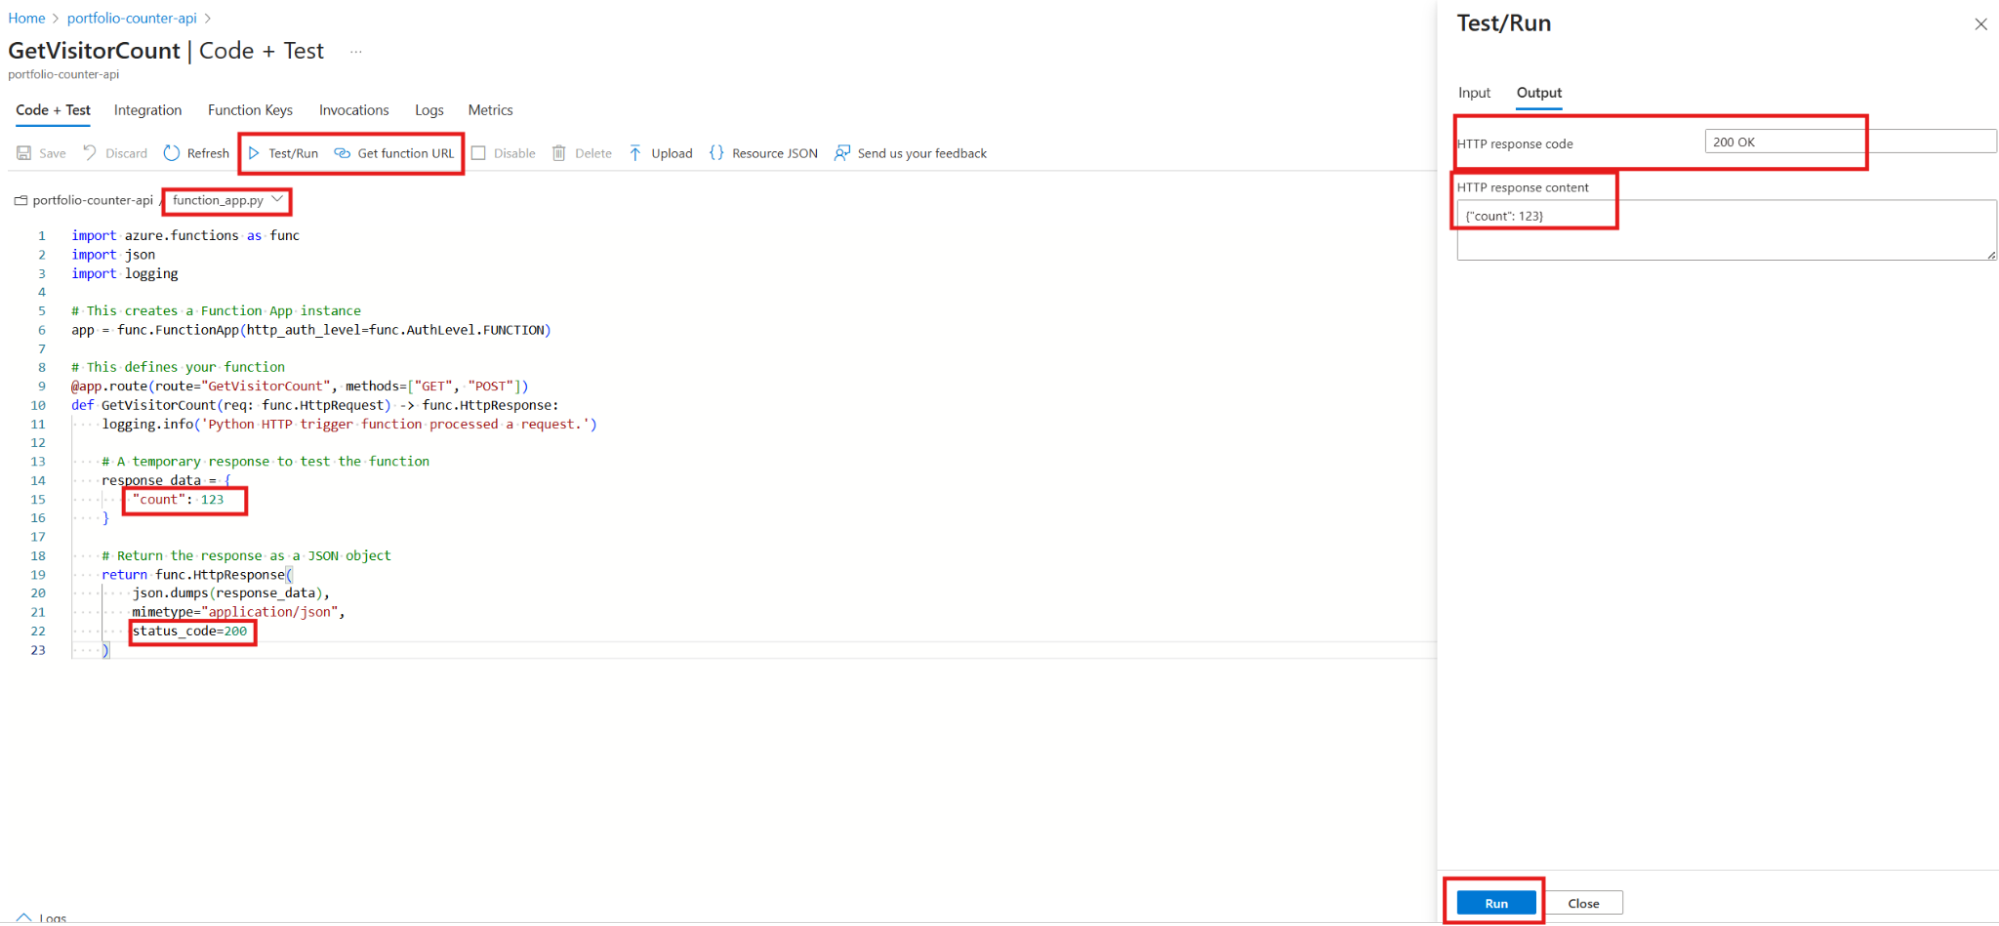
- After the function is created, it will go to its overview page. In the left menu under "Developer", click on Code + Test.
- Add function to
function_app.py. Copy and paste following code:
import azure.functions as func
import json
import logging

# This creates a Function App instance
app = func.FunctionApp(http_auth_level=func.AuthLevel.FUNCTION)

# This defines your function
@app.route(route="GetVisitorCount", methods=["GET", "POST"])
def GetVisitorCount(req: func.HttpRequest) -> func.HttpResponse:
    logging.info('Python HTTP trigger function processed a request.')

    # A temporary response to test the function
    response_data = {
        "count": 123
    }

    # Return the response as a JSON object
    return func.HttpResponse(
        json.dumps(response_data),
        mimetype="application/json",
        status_code=200
    )
- Click the Test/Run, don't need to change any settings, just hit Run for a test. The Output section at the bottom. An HTTP request successfully triggered the function, indicated by a
HTTP response code: 200 and the message {"count": 123} in the response body.
Phase 2: Create The Azure Cosmos DB Account
First, I need the main Cosmos DB account, which will hold our databases and containers.
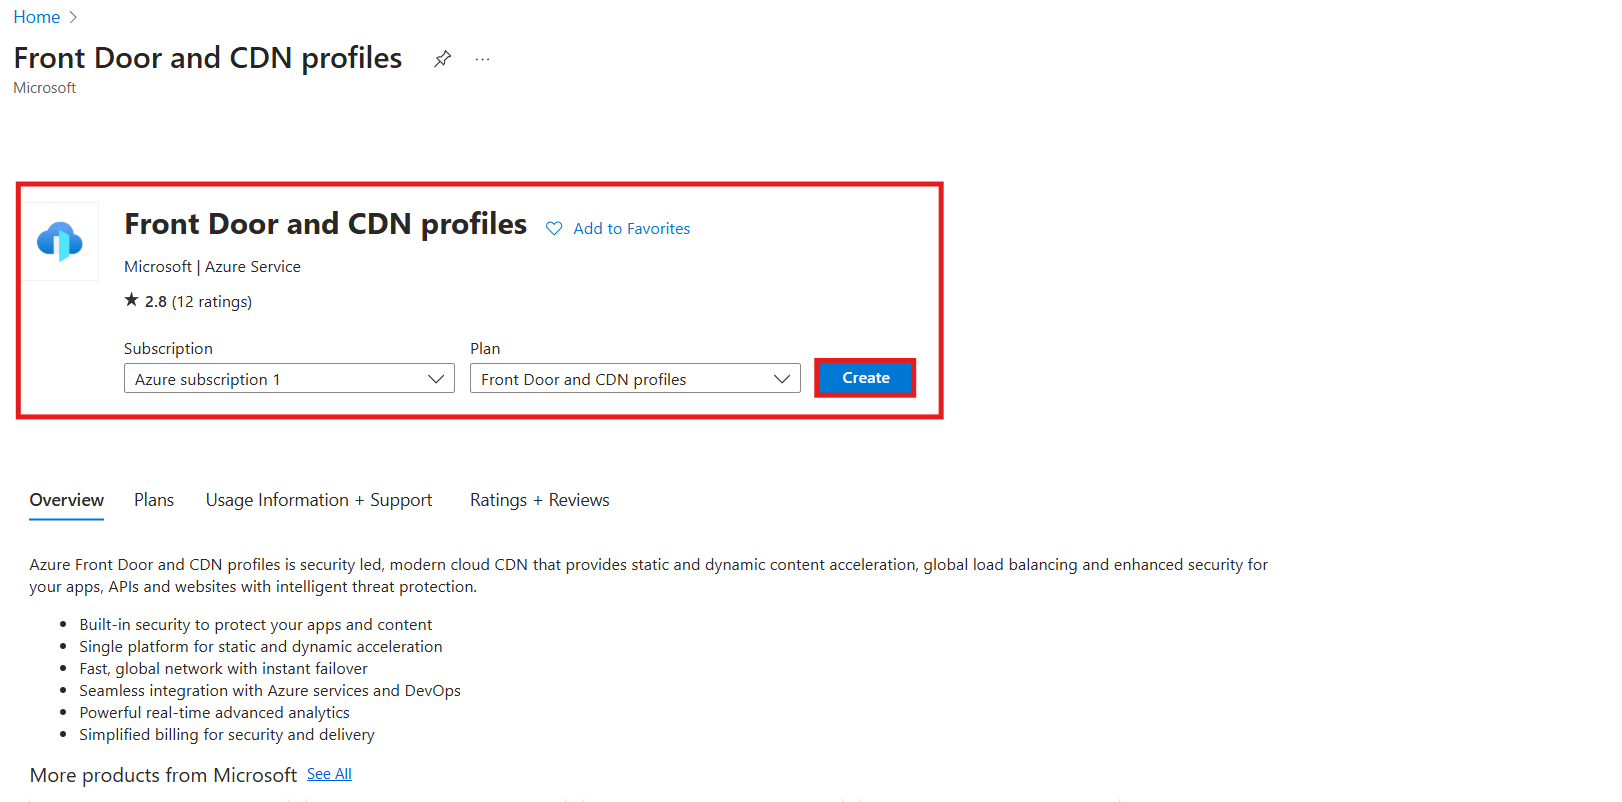
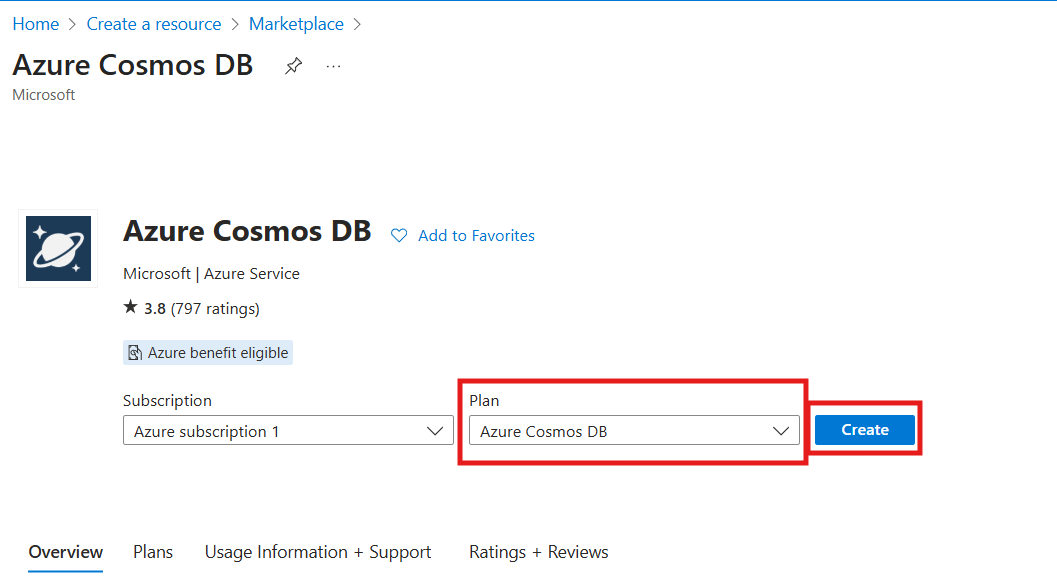
2.1. Navigate to Create Resource:
- In the Azure Portal, click the + Create a resource button.
- Search for
Azure Cosmos DB and select it.
- Click Create.
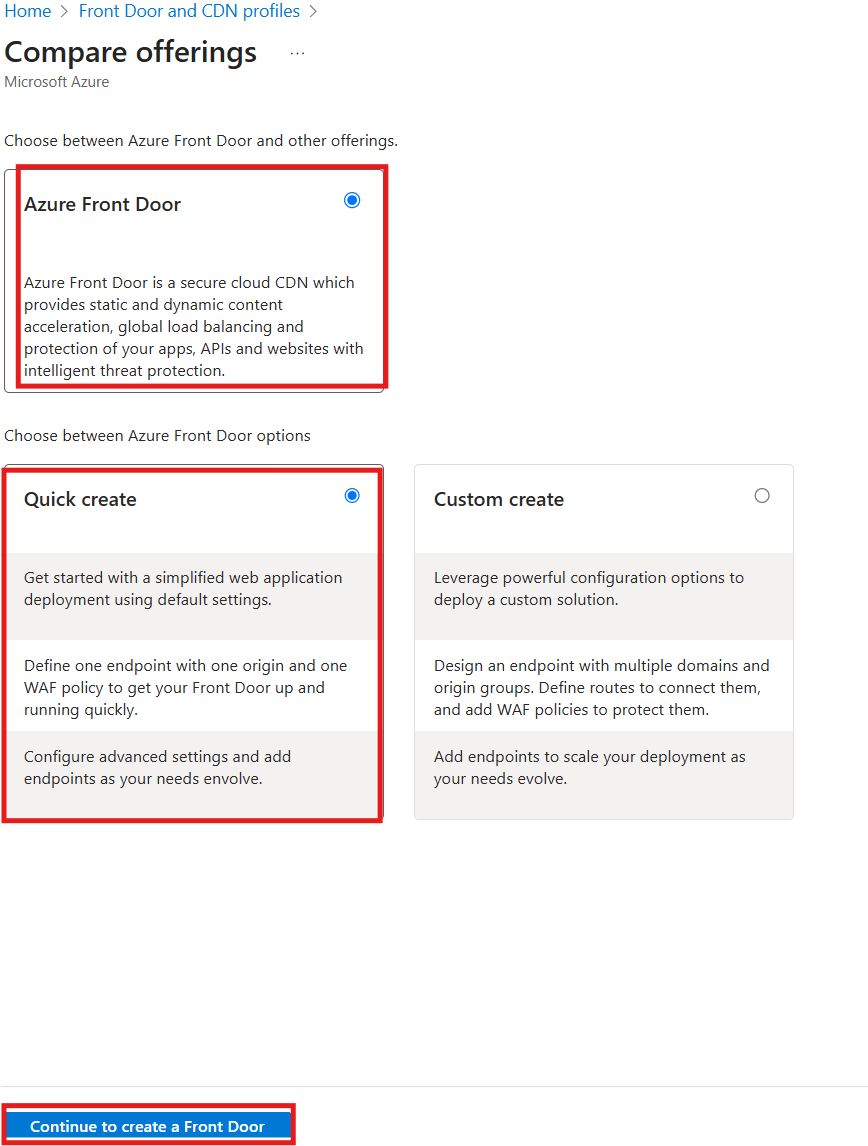
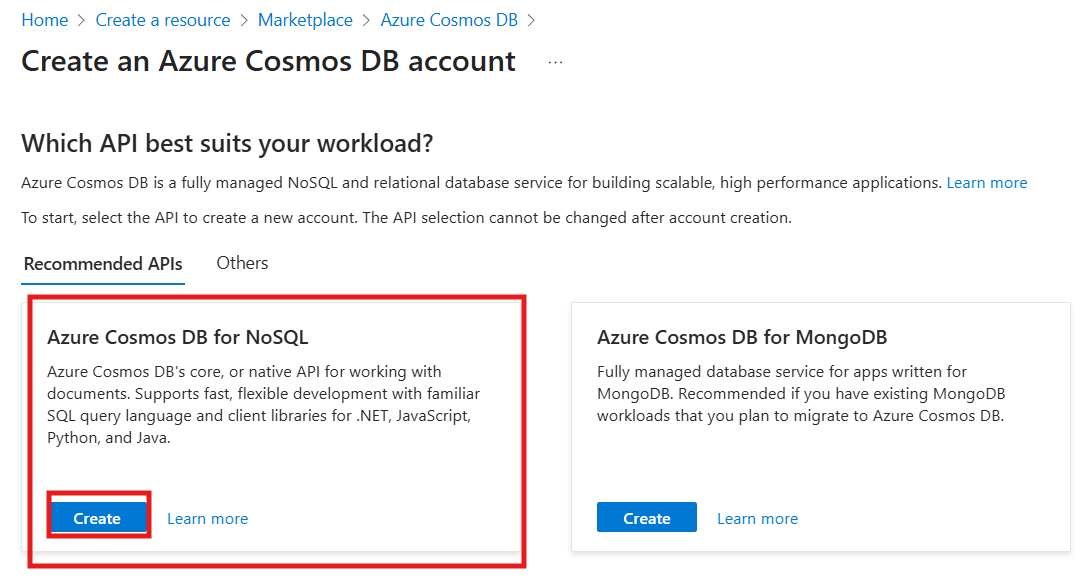
2.2 Choose the API:
- You will see several API options. Find the Azure Cosmos DB for NoSQL box and click Create.
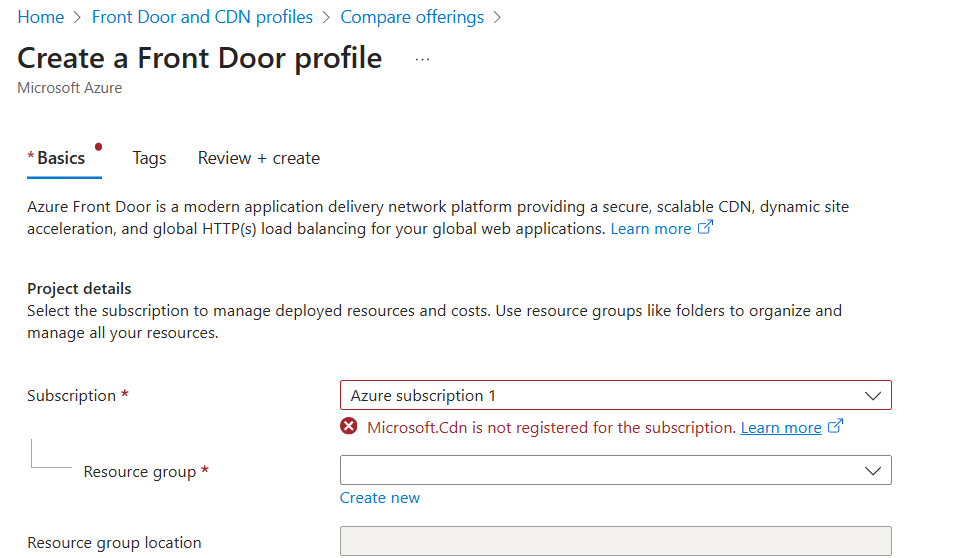
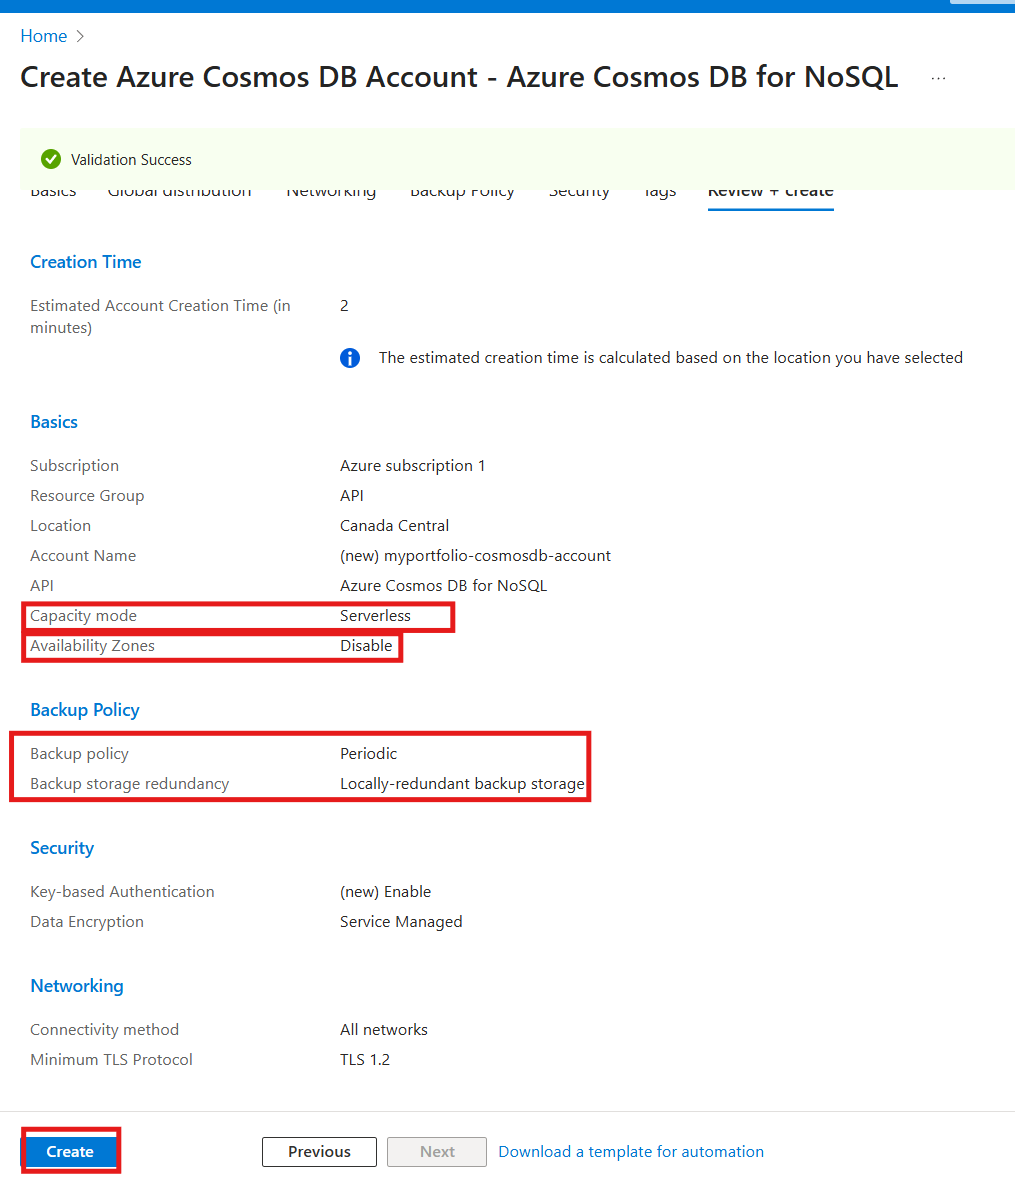
2.3. Configure the Account:
- Workload Type: choosing Learning for the most cost-effective setup to complete the project.
- Subscription / Resource Group: Choose your existing ones.
- Account Name: Give it a globally unique name.
- Location: Choose a region close to you.
- Capacity mode: This is important for cost. Select Serverless.
- Availability Zones: Disable. Can lower expenses.
- In Backup Policy tab, Backup storage redundancy: For the most cost-effective option, select Locally-redundant backup storage.
- Click Review + create, and then Create. Deployment will take 5-10 minutes.
Phase 2.4: Create Database and Container
Once the Cosmos DB account is deployed and go to the Cosmos DB account, use the Data Explorer to create the container that will hold the data.
2.4.1 Open Data Explorer:
- In the left-hand menu of your Cosmos DB account, click on Data Explorer.
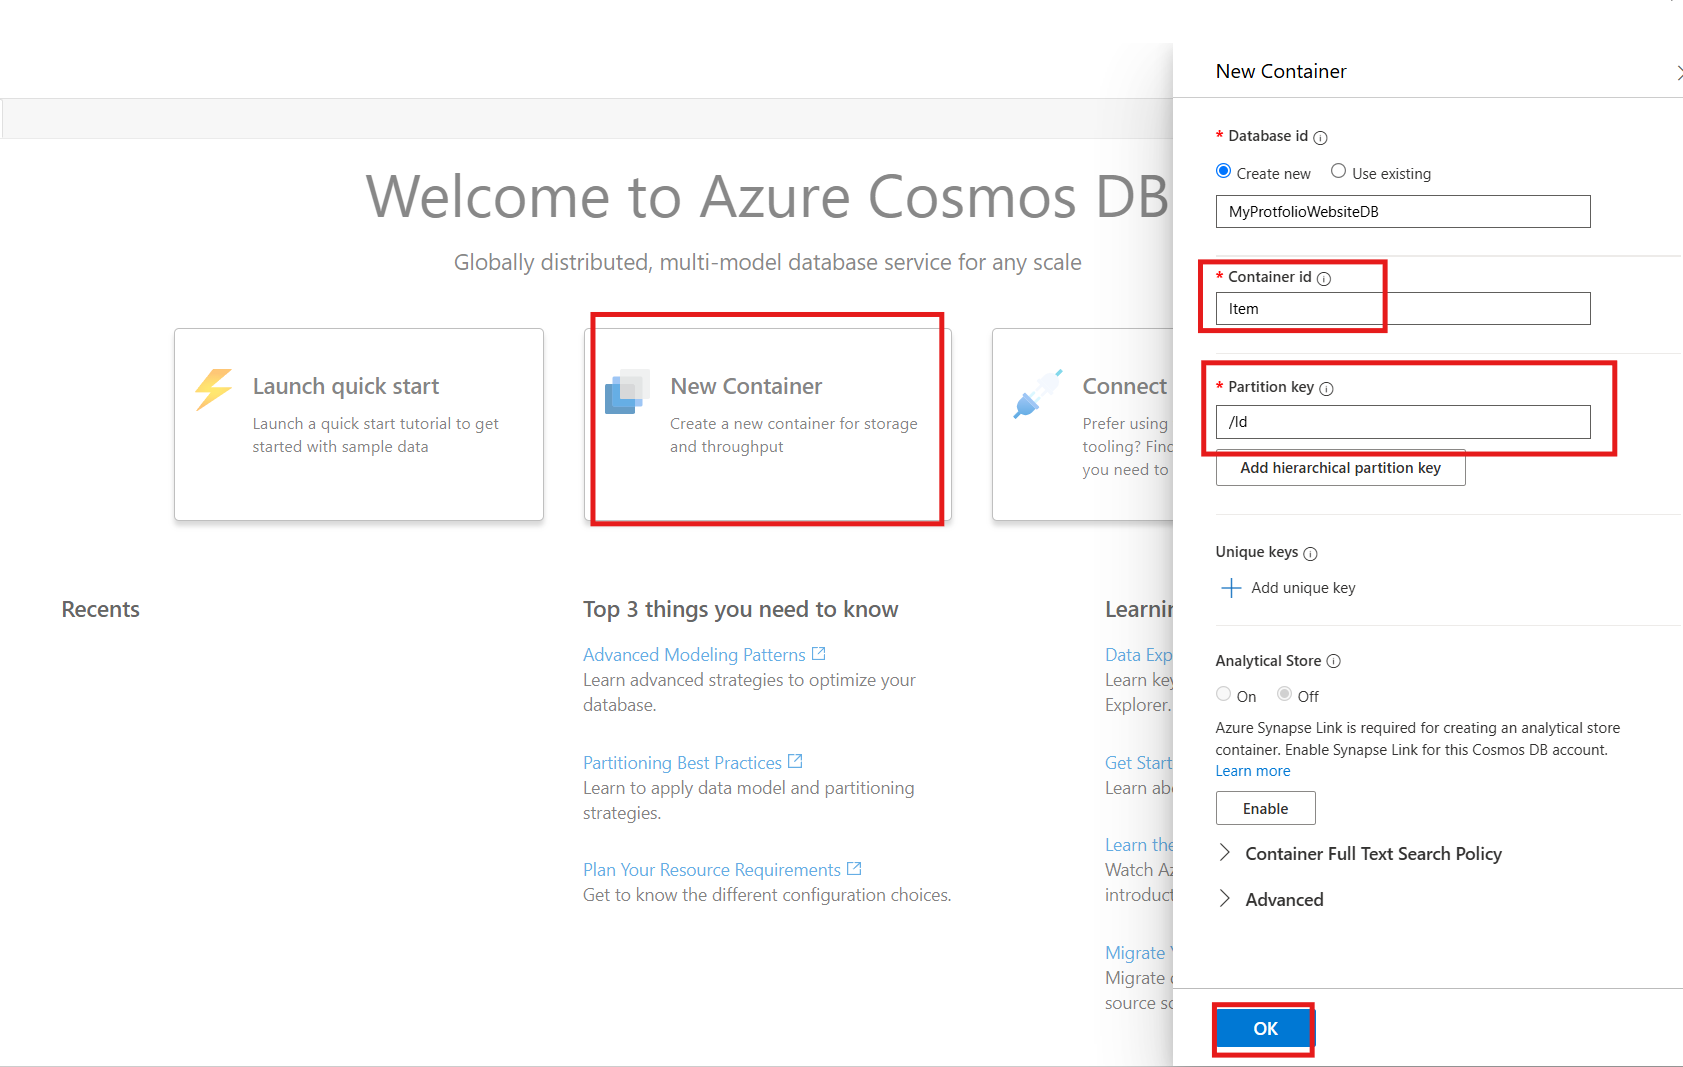
2.4.2 Create New Container:
- In the Data Explorer pane, click the New Container.
2.4.3 Configure the Database and Container: A "New Container" panel will appear. Fill it out as follows:
- Database ID: Select Create new and give it a name, for example,
MyWebAppDB.
- Container ID: This is the name of your "table". Let's call it
Items.
- Partition key: This is the most important setting. It's how Cosmos DB efficiently organizes data. For a general-purpose container, a great starting point is
/id.
/id to tell Cosmos DB to group the data based on each item's unique id field.
- Click OK.
Phase 2.5: Add Data to The Table
Make a quick test to confirm functionality.
2.5.1 Navigate to Your Container:
- In Data Explorer, expand it and click on
Items container.
- Under
Items, click on Items.
2.5.2 Create a New Item:
- Click the New Item button in the top bar.
2.5.3 Add some JSON Data for testing:
- A new editor window will open with some default text. Replace it with the following simple JSON document. It has an
id field, which matches the partition key I defined (/id).
{
    "id": "item001",
    "category": "Laptops",
    "brand": "Contoso",
    "productName": "Contoso Laptop Pro",
    "inStock": true
}
- Create a new object for item002
{
    "id": "item002",
    "category": "Laptops",
    "brand": "Fabrikam",
    "productName": "Fabrikam Ultrabook",
    "inStock": false
}
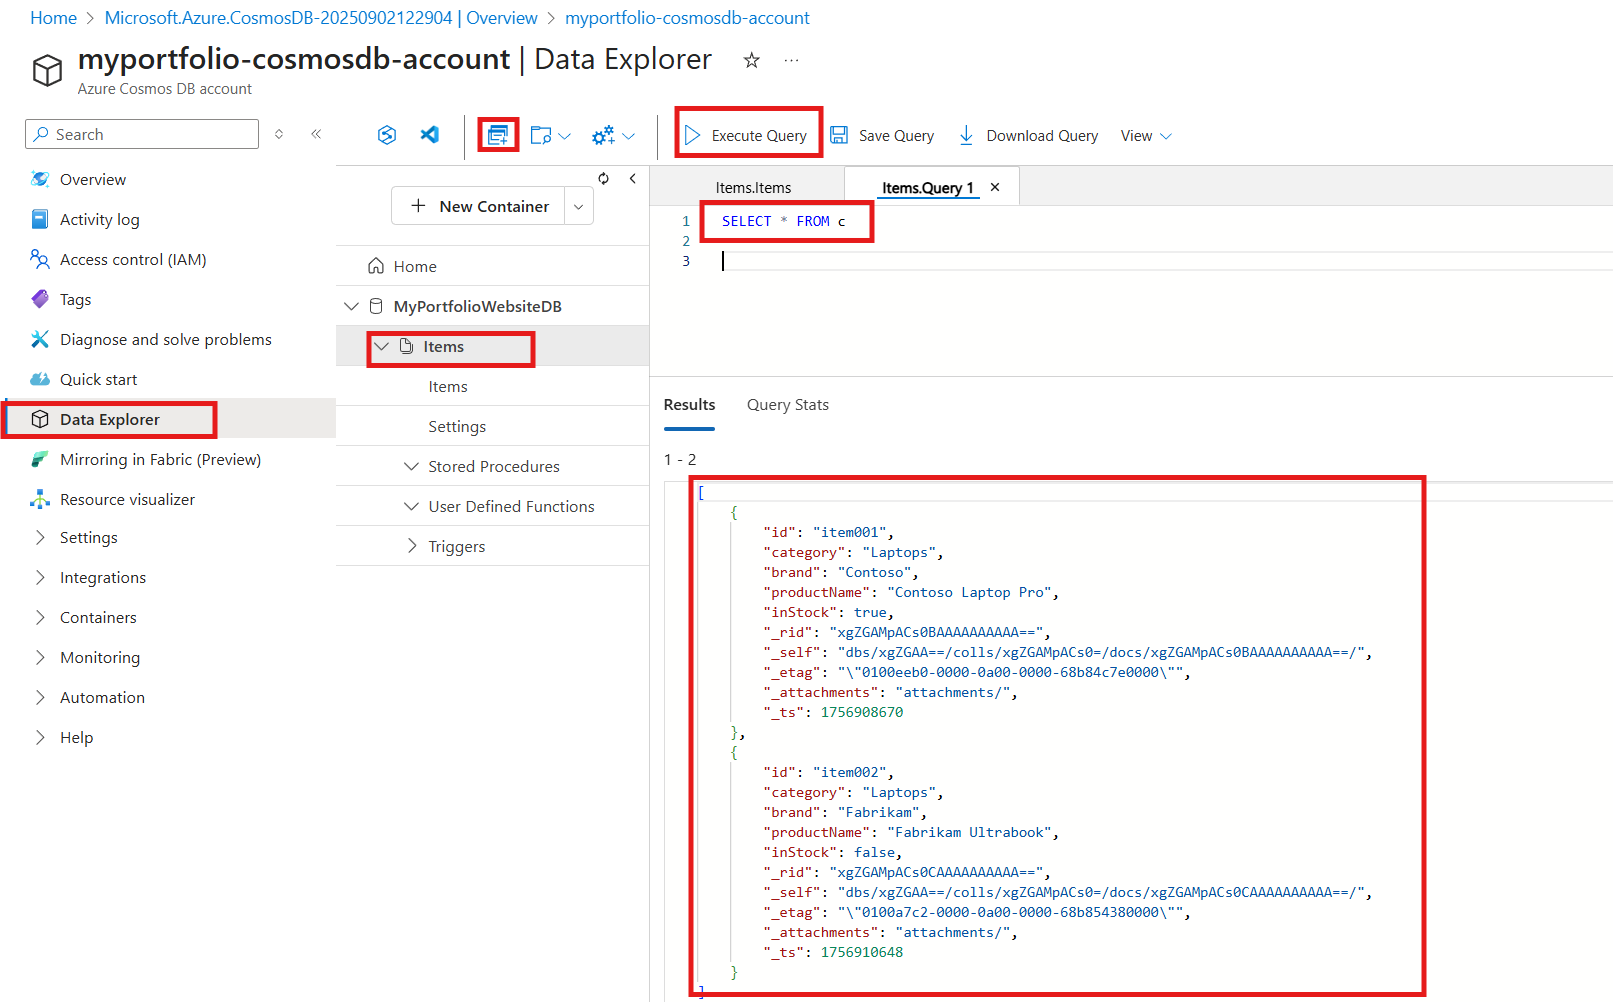
2.5.4 Query the JSON Data:
From the Data Explorer blade, select "New SQL Query" from the top bar, then type SELECT * FROM c, and click Excute Query.
SELECT * FROM c where c.id = "item002" Get one item by its ID.
SELECT c.productName, c.brand FROM c WHERE c.inStock = true finds all products that are in stock and returns only their name and brand.
Phase 2.6: Connect The API To The Database
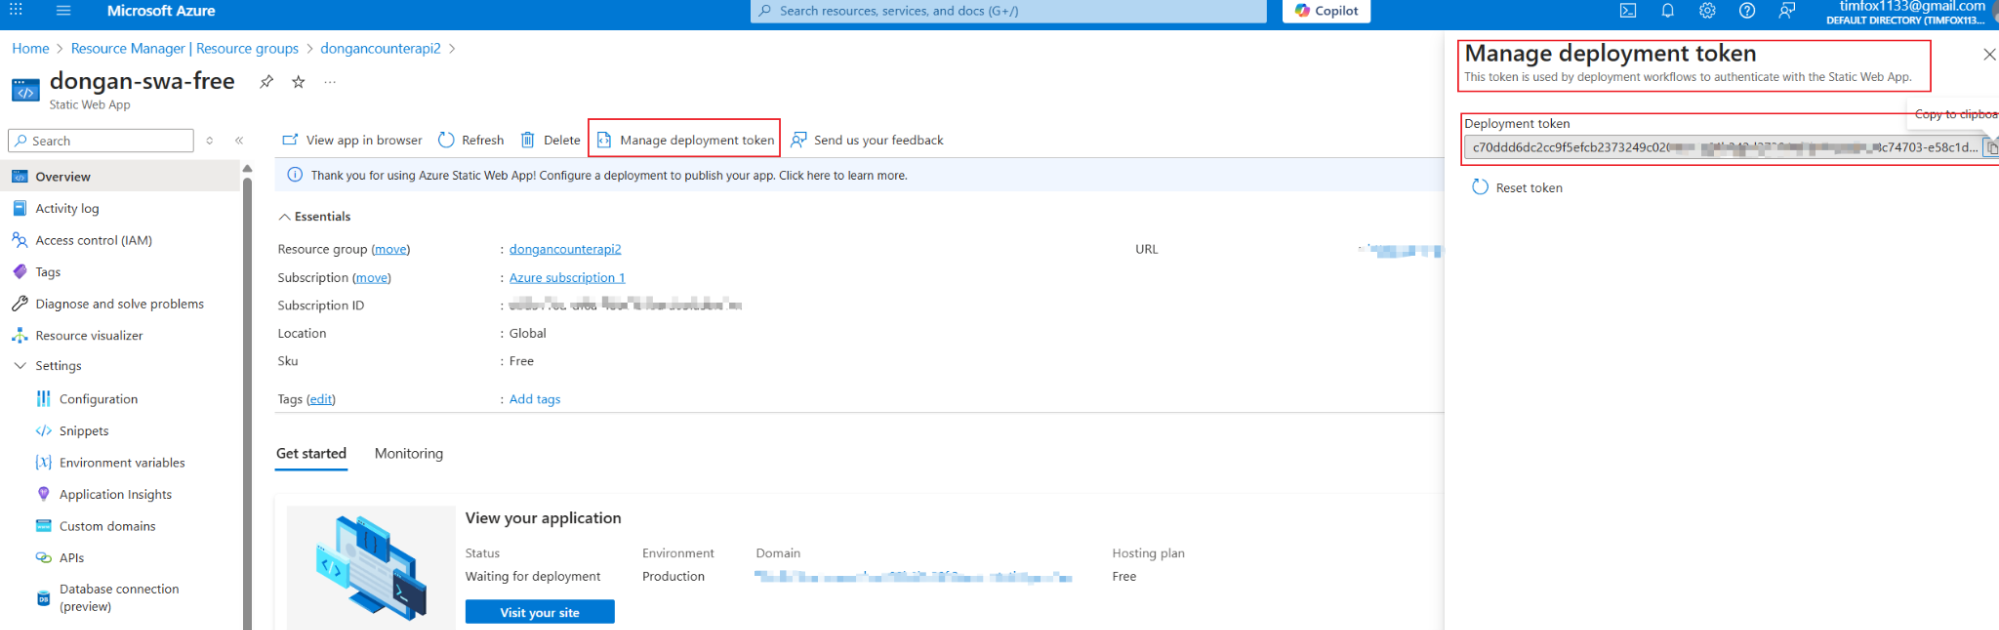
2.6.1. Get the Database Connection String
The Function App requires the database's connection string (password) to establish a connection.
- In the Azure Portal, navigate to the Azure Cosmos DB account
- In the left menu under "Settings", click on Keys.
- Find the PRIMARY CONNECTION STRING and click the copy icon to its right.
2.6.2. Add the Connection String to Your Function App
- Navigate to Function App (
dongan-counter-api) in the Azure Portal.
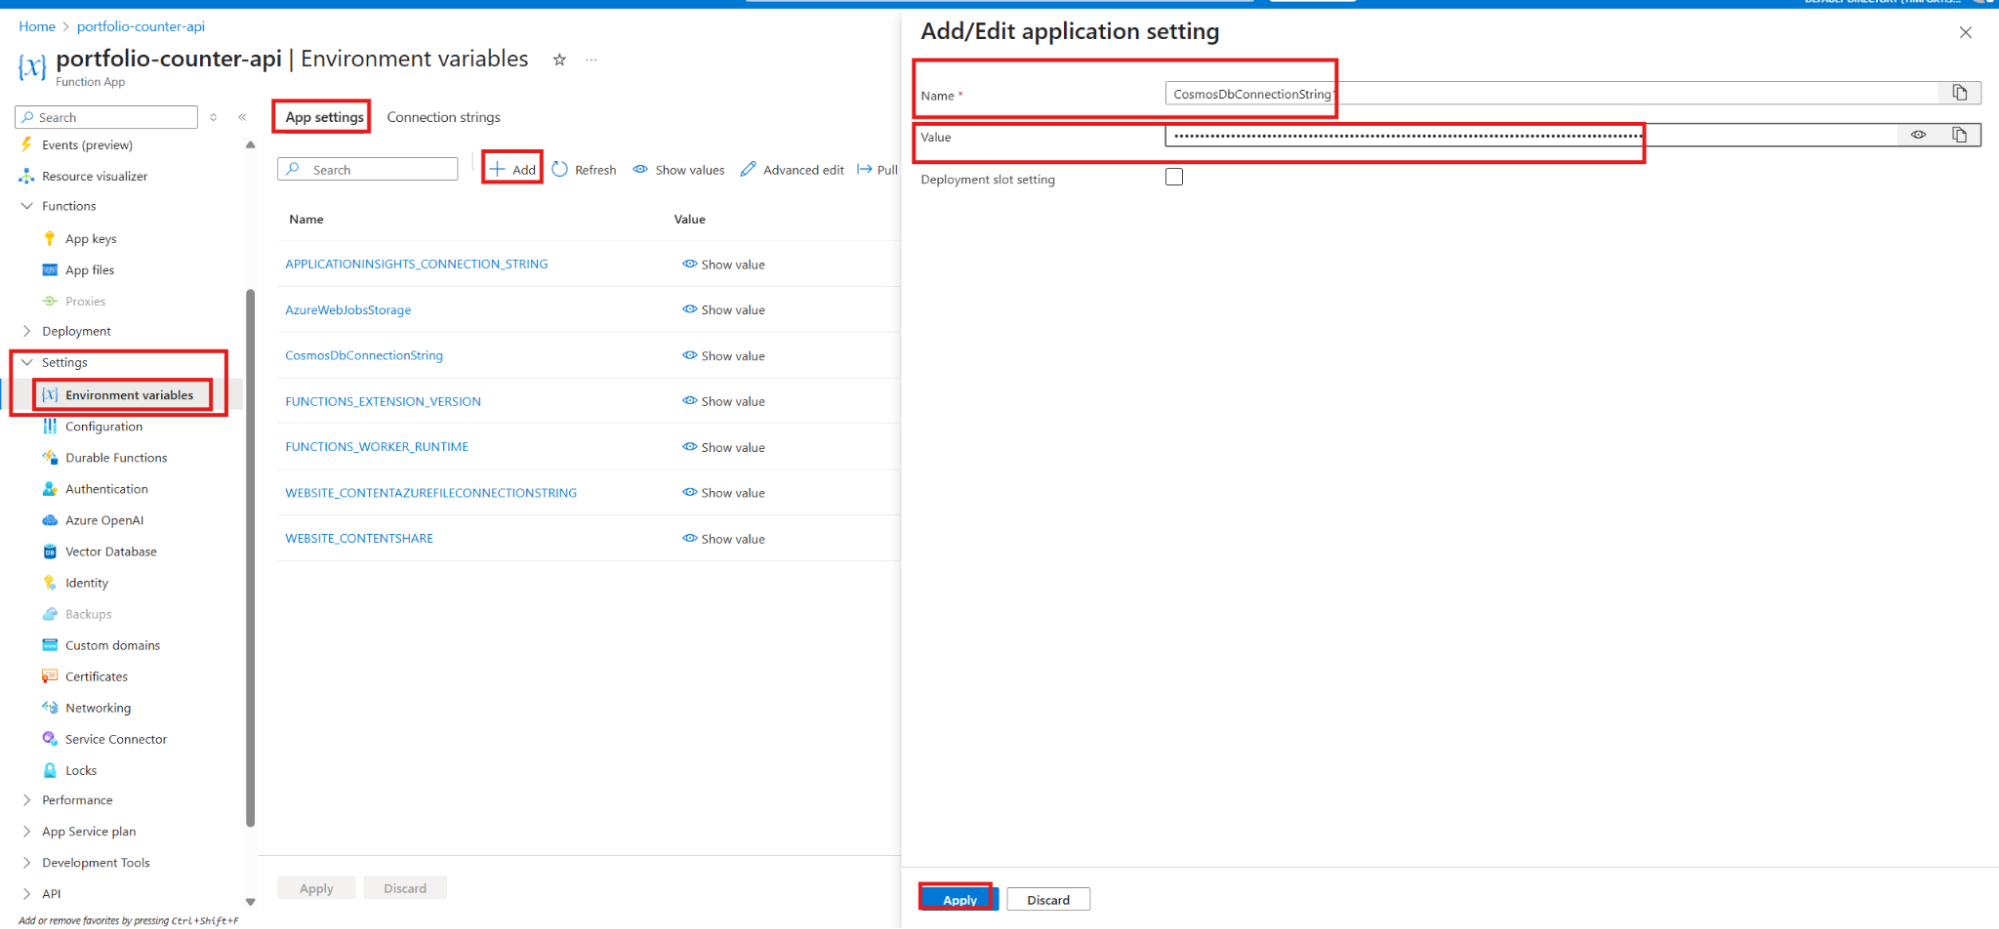
- In the left menu under "Settings", click on Environment variables.
- click + App settings.
- A window will pop up. Fill it out as follows:
- Name:
CosmosDbConnectionString.
- Value: Paste the
PRIMARY CONNECTION STRING copied from Cosmos DB.
- Click Apply, and then at the top of the Configuration page, click Save. A confirmation to restart the app will appear; click Continue.
Phase 3: Trigger Azure Function From Static Site
3.1: Write the Python API Logic
The Python code to process data sent from the static site. I use a simple contact form submission as an example.
Open the __init__.py file inside new function folder (e.g., api/__init__.py) and replace the code with the following:
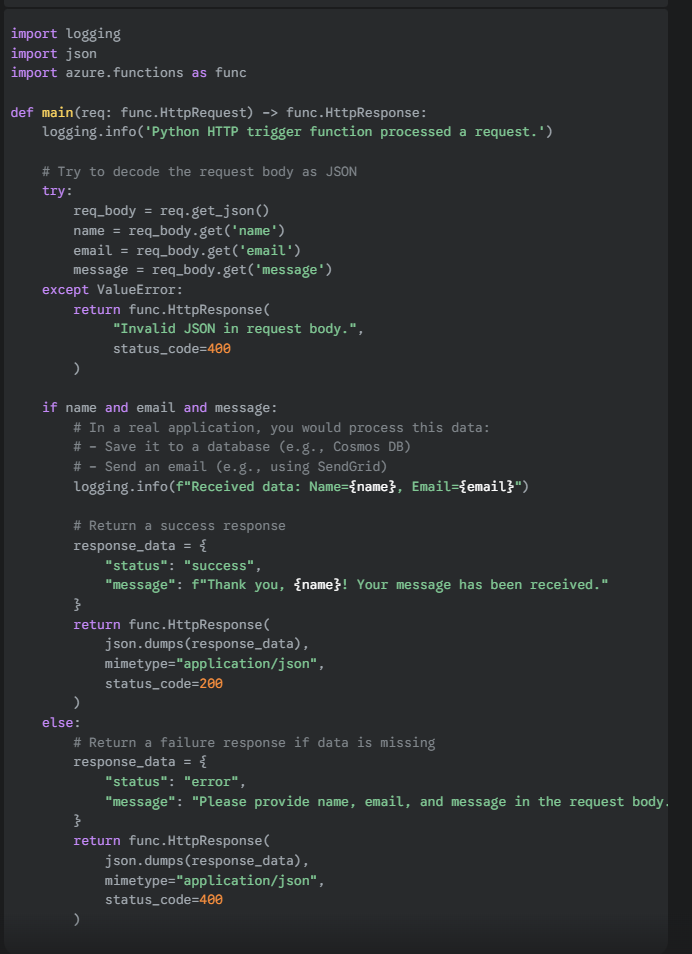
This code expects a POST request with a JSON body containing a name, email, and message. It then returns a JSON success or error message.
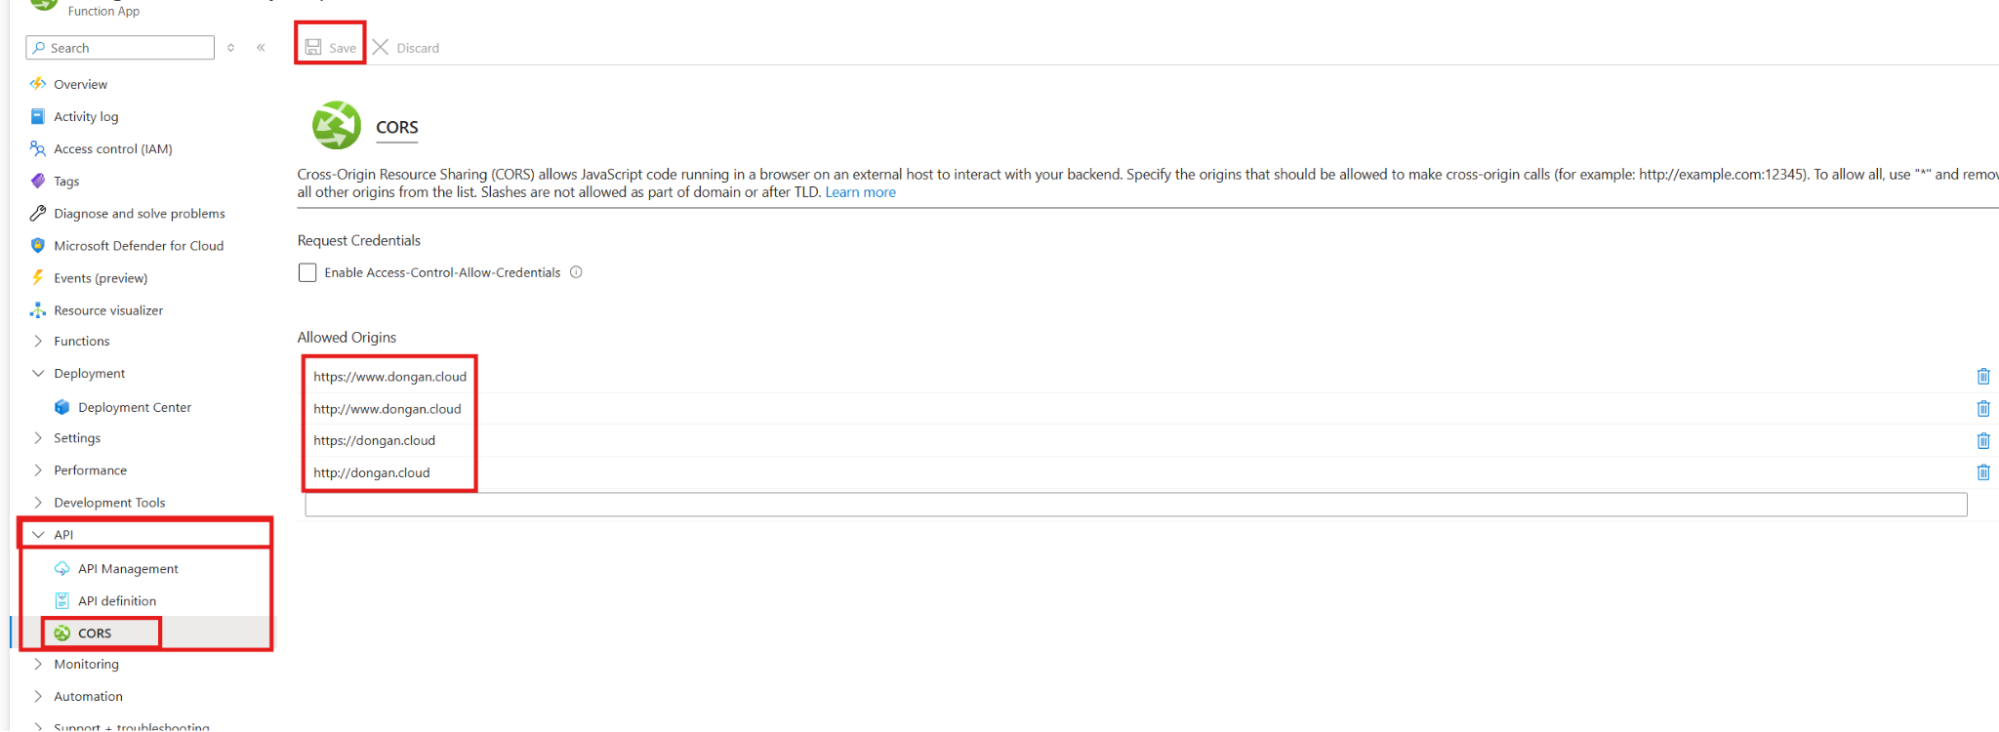
3.1.1: Configure CORS (Crucial Step!)
Browser security will block requests unless Cross-Origin Resource Sharing (CORS) is enabled, because the static website and the function app are on different domains.
- Configure CORS in the Azure Portal after function deployment.
- Go to the Azure Portal and find your deployed Function App.
- In the left menu, under the "API" section, click on CORS.
- In the "Allowed Origins" box, add the URL of your static website. Can also use * to allow all domains for testing, but it's more secure to specify the exact domain.
- Click Save.
Phase 3.2:Call The API From The Static Site
Lastly, modify the JavaScript on the static website to invoke this new API endpoint.
document.getElementById('contactForm').addEventListener('submit', async function (event) {
    event.preventDefault(); // Prevent the default form submission

    const name = document.getElementById('name').value;
    const email = document.getElementById('email').value;
    const message = document.getElementById('message').value;
    const responseElement = document.getElementById('response');

    // IMPORTANT: Replace with your actual Azure Function URL
    const functionUrl = 'https://YOUR-FUNCTION-APP-NAME.azurewebsites.net/api/YOUR-FUNCTION-NAME';

    try {
        const response = await fetch(functionUrl, {
            method: 'POST',
            headers: {
                'Content-Type': 'application/json',
            },
            body: JSON.stringify({ name, email, message }),
        });

        const result = await response.json();

        if (response.ok) {
            responseElement.textContent = result.message;
            responseElement.style.color = 'green';
        } else {
            responseElement.textContent = `Error: ${result.message}`;
            responseElement.style.color = 'red';
        }
    } catch (error) {
        responseElement.textContent = 'An unexpected error occurred.';
        responseElement.style.color = 'red';
        console.error('Error:', error);
    }
});
Troubleshooting & Outcomes:
1.Azure Function Disappear:
- Syntax Errors: Incorrect code syntax can cause deployment failures. Getting a
404 Not Found error and then seeing the function disappear
- Missing
requirements.txt: This file, which lists project dependencies, is crucial for successful cloud builds.
- Inefficient Deployment (
.funcignore): The .funcignore file should be used to exclude env and .venv folders to prevent slow or broken cloud builds.
- Python Version Mismatch: Ensure the Python version in Stack settings matches your development environment.
- Incorrect CosmosDB Connection String: The
CosmosDbConnectionString must be the PRIMARY CONNECTION STRING for proper database identification and authentication.
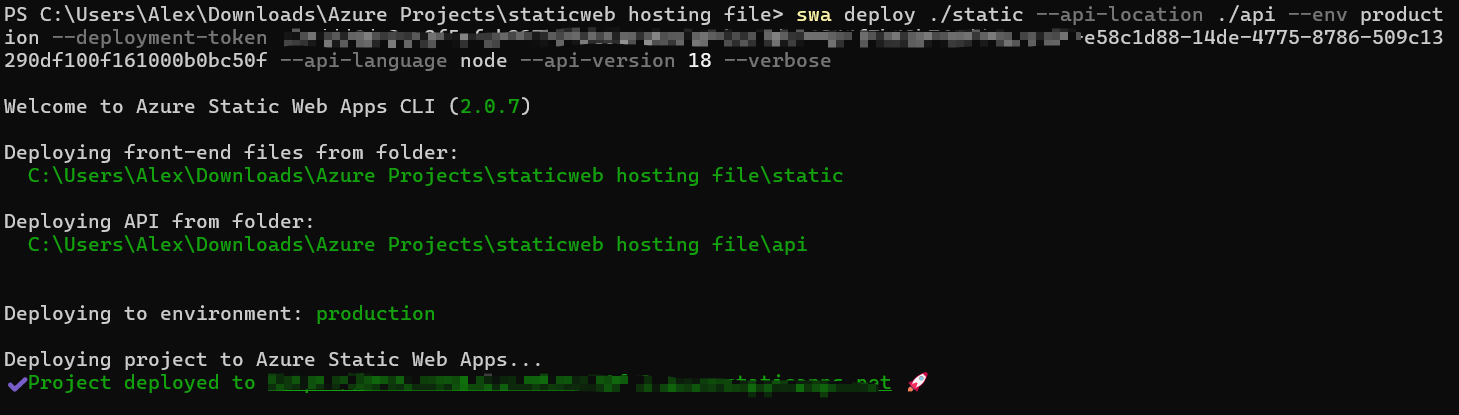
- Deployment Log Inspection: Always review the OUTPUT terminal window in VS Code for detailed deployment status and error messages.
- Verify Azure deployment and output using the VS Code terminal.
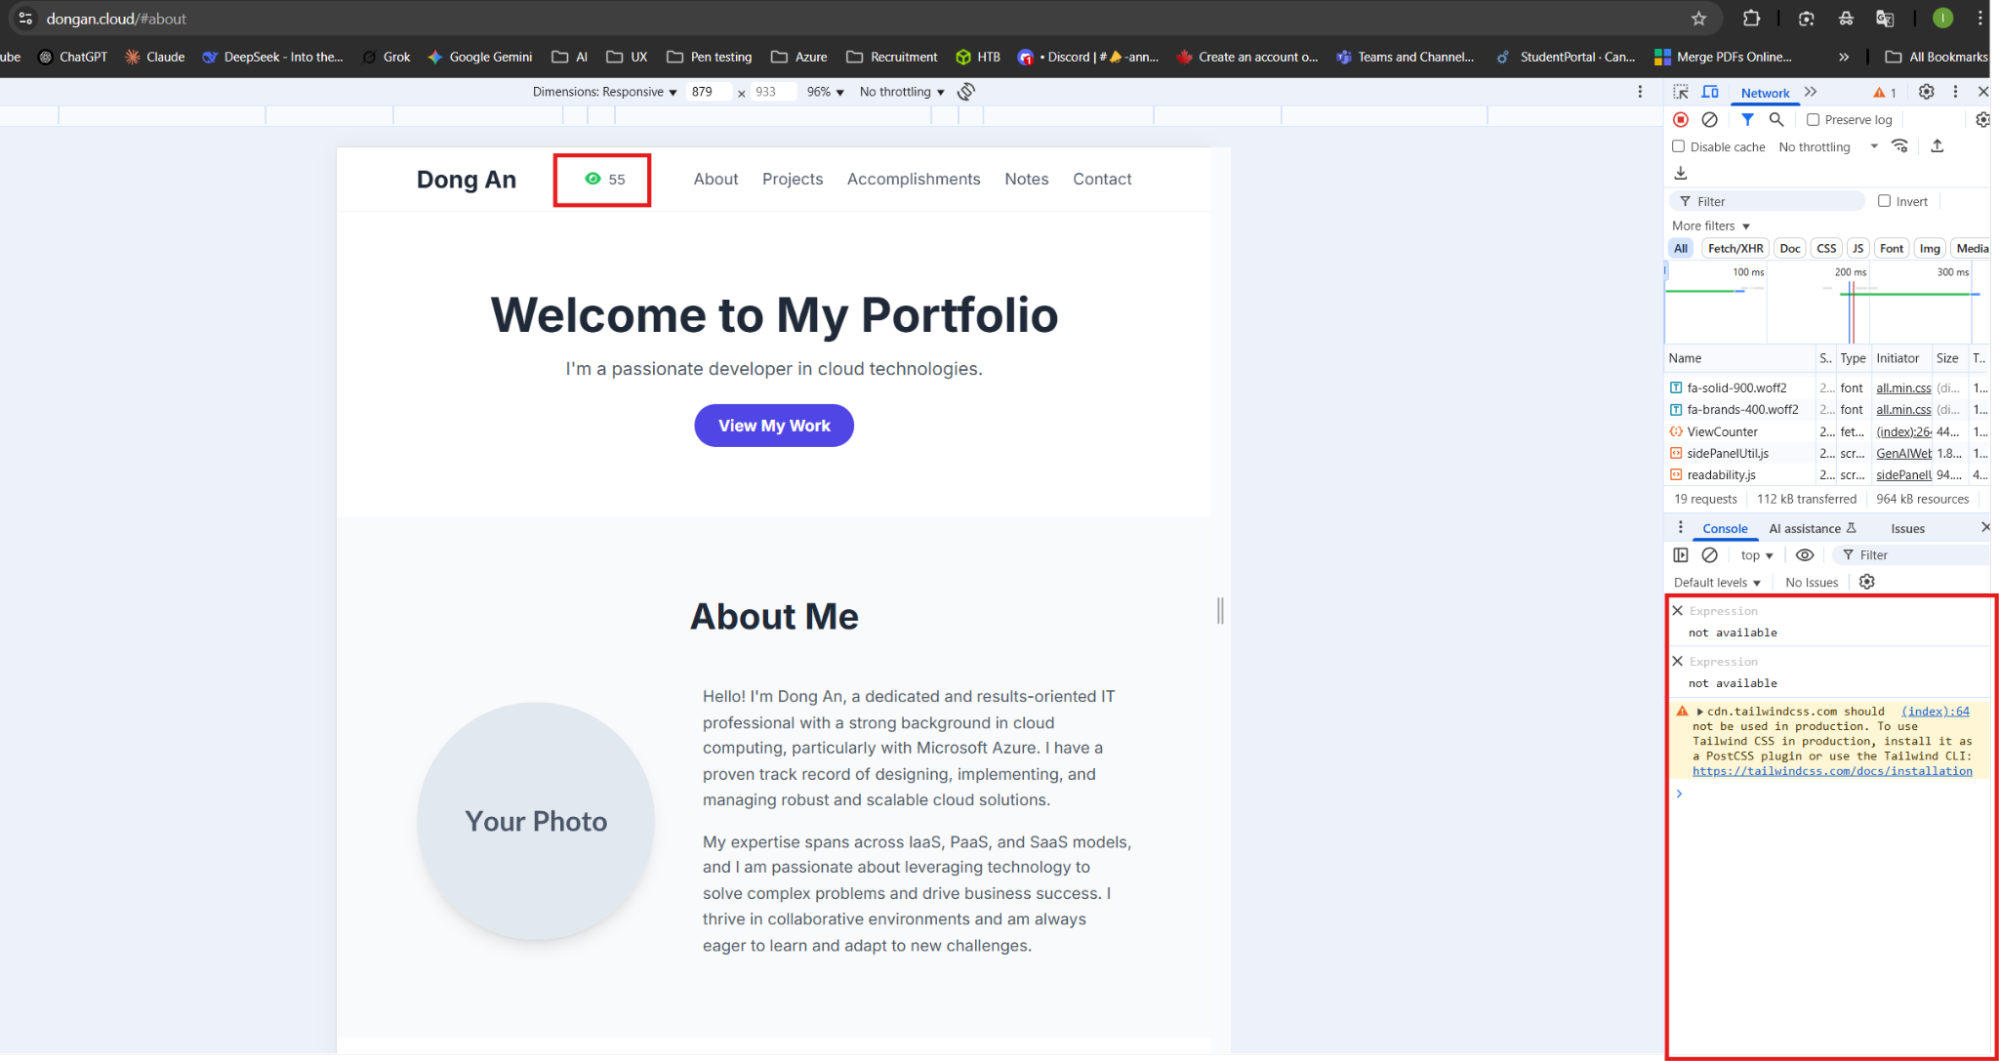
- Open the website and inspect the errors
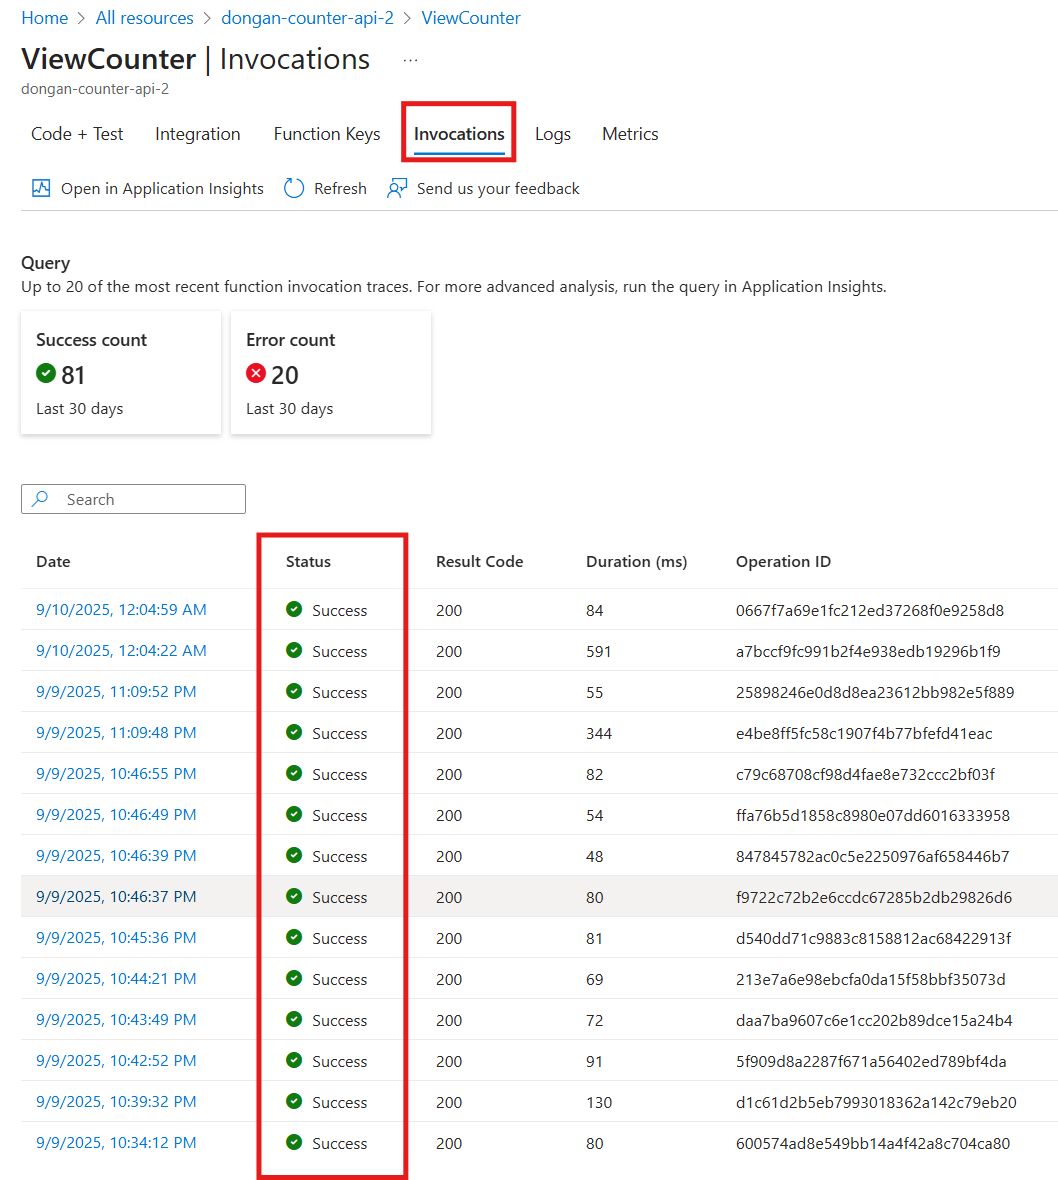
2. Counter silent crash, keep loading, not responding: because the function cannot connect to Cosmos DB database.
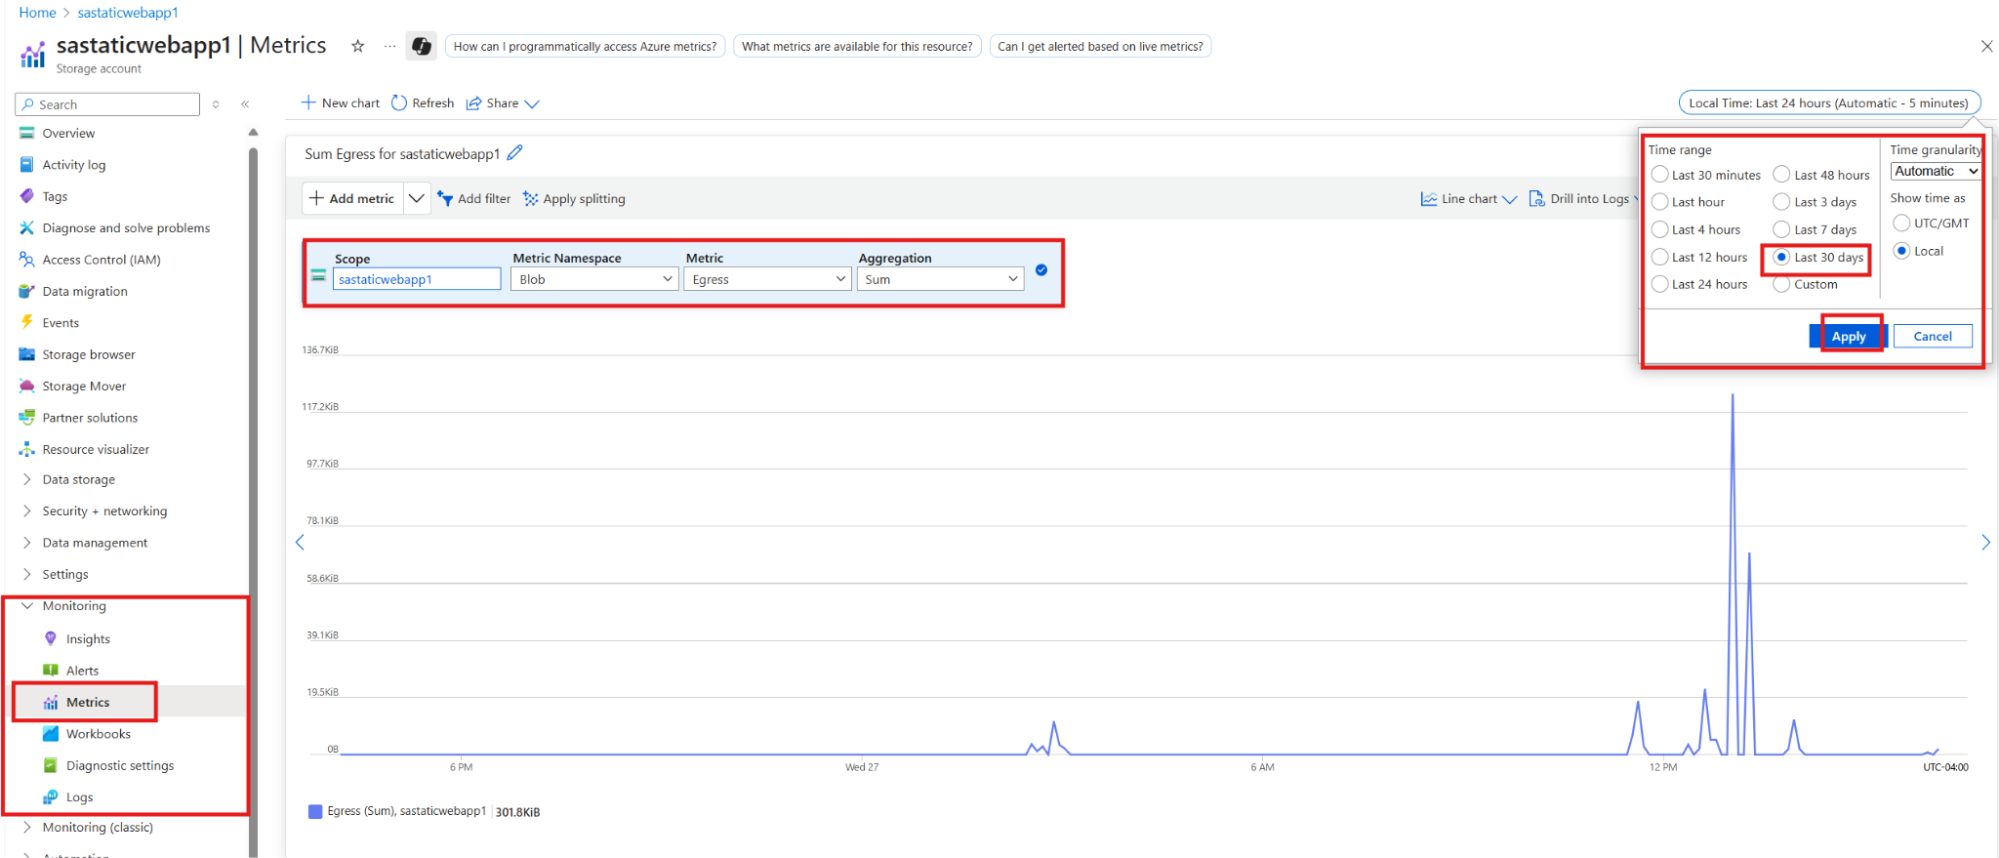
To check for the real error, go to the functions page, click on Monitor then Invocations, and review the invocation details.
On the app settings, under Environment variables, verify the DB name and its value. Also, check if the DB primary key is being used for the DB key.
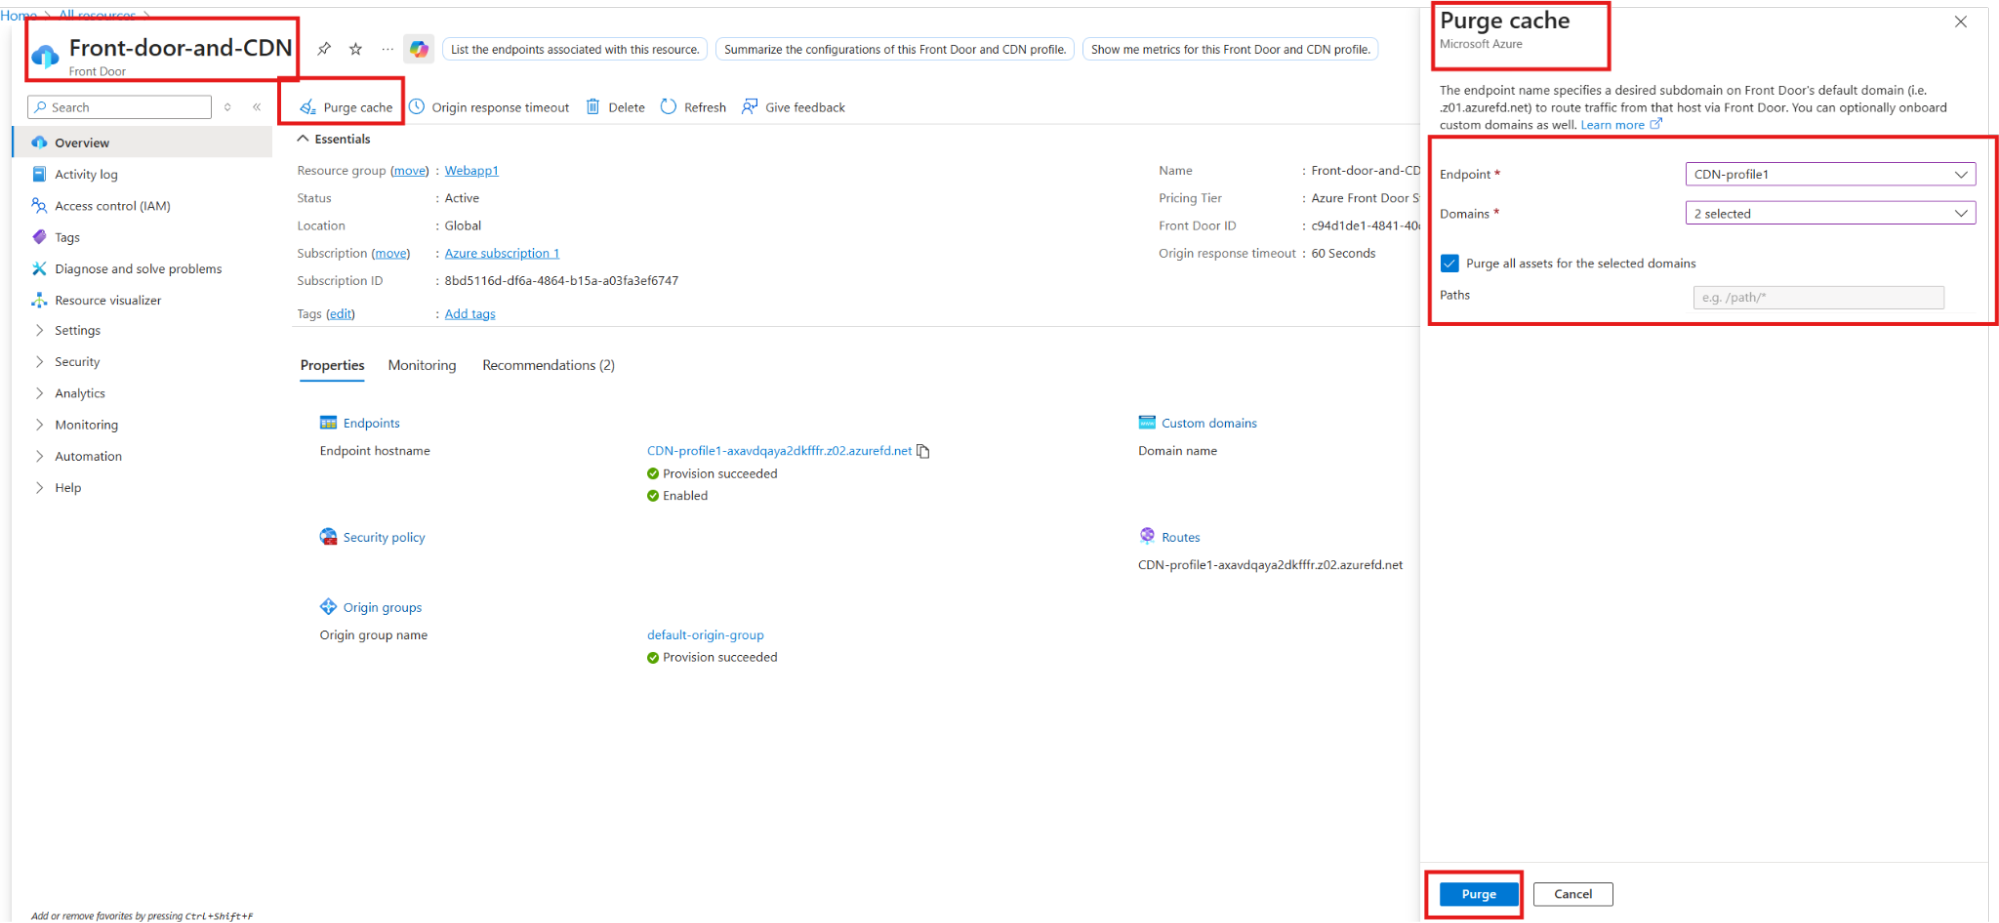
3. Stale CDN Cache, the counter not working,Error fetching view count: Error: Failed to fetch Stack: TypeError: Failed to fetch
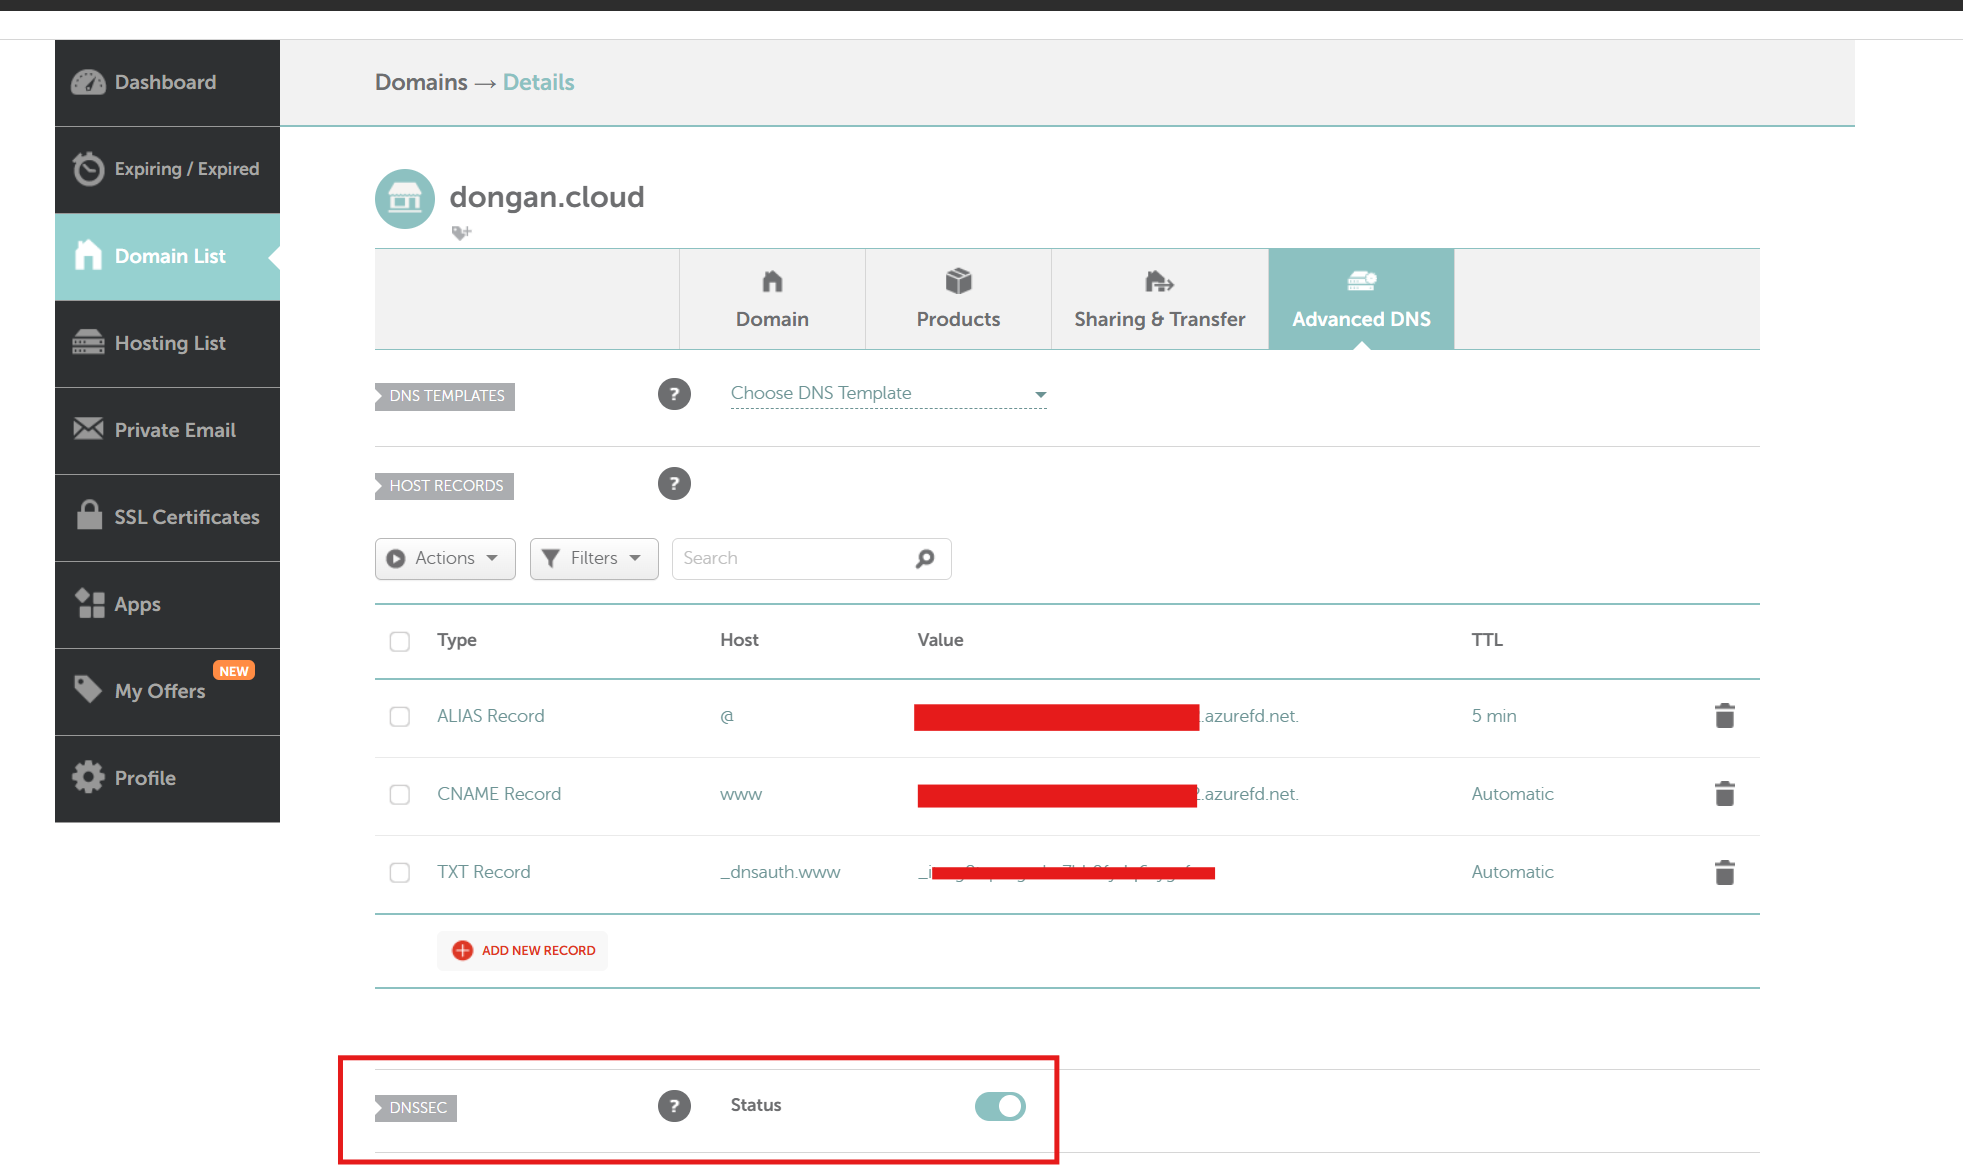
Azure CDN cached a "permission denied" response from the function due to missing CORS settings. Even after fixing CORS on the function, browser still receives the old, cached "permission denied" response from the CDN. Need to force all Azure CDN servers to delete their cached version of the files and get the latest version from function. Go to AFD→Overview→Purge Cache→Select endpoint and domains→Click Purge
4. For cosmos DB:
Data cannot be appended a vaule after existing vaule. To add new vaule, you must create a completely new document for it, you can’t append value to one key-vaule pair, it won’t merge two different value into one single, invalid JSON object. Every item is its own separate, self-contained JSON document.
5. Binding:
AzureWebJobsStorage is for the Azure Functions system to work properly, while StaticWebAppStorage is for the specific application code to find its data. After the code deploy to Azure, it needs the path and password for the database.
Name: COSMOS_ENDPOINT Value: https://portfoliodb-viewer-counter.documents.azure.com:443/
Name: COSMOS_KEY Value: Cosmos DB Primary Key (qSUIQ...==)
6. Security Concern
Secrets (Connection Strings/API Keys): This involves storing sensitive credentials (like connection strings for storage or instrumentation keys for Application Insights) directly within your Function App's configuration. While functional, it carries a higher security risk because if someone gains access to the app's configuration, they get the secrets.
Managed Identity: This is Azure's recommended best practice for secure access between Azure services. Instead of storing credentials, Function App is automatically given an identity within Azure Active Directory. Then grant this identity specific permissions to other resources (like Application Insights or Storage Accounts) via Azure Role-Based Access Control (RBAC).
Benefits: No secrets to manage or rotate, greatly reduced risk of credential leakage, and seamless authentication handled by Azure.
6.1. System-Assigned Managed Identity
- Lifecycle: It is created and deleted with the Azure resource it's assigned to. If you delete your Function App, its system-assigned identity is also deleted automatically.
- Sharing: It cannot be shared. The identity is tied one-to-one with a single Azure resource (e.g., one Function App or one VM).
- Use Case: This is perfect for workloads that are contained within a single Azure resource. For your simple view counter Function App, this is the ideal choice because the identity is only needed by that one app.
6.2. User-Assigned Managed Identity
- Lifecycle: It is a standalone Azure resource that you create and manage separately. Deleting a Function App that uses it does not delete the user-assigned identity. You must delete it yourself.
- Sharing: It is designed to be shared. You can create one user-assigned identity and assign it to multiple Azure resources (e.g., multiple Function Apps, VMs, and Logic Apps).
- Use Case: This is useful when you have a group of resources that all need the same set of permissions. For example, if you had ten different Function Apps that all needed to access the same database, you would create one user-assigned identity, give it permission to the database, and then assign that identity to all ten functions. This simplifies permission management.
7. Security Concern
The public API, which is linked to the public website, currently lacks authentication. This makes it discoverable and directly accessible to anyone online, potential risks such as Denial-of-Service (DoS) attacks and injection attacks. To reduce these risks, I need to implement a Web Application Firewall (WAF) or an API Management solution.
Outcomes:
For my portfolio website, I designed and deployed a dynamic, highly scalable visitor counter using a modern, fully serverless architecture on Microsoft Azure. The solution is built for cost-efficiency and low maintenance, leveraging Azure Functions for backend compute, Cosmos DB for persistent data storage, and Azure Front Door as the content delivery network.
I specifically chose a serverless architecture for several key reasons:
- Cost-Effectiveness: The primary driver was cost. By using Azure Functions and Cosmos DB in serverless/consumption mode, I only pay for the exact resources used per execution. For a portfolio with variable traffic, this is significantly cheaper than maintaining an always-on server, and the generous free tiers effectively make the solution free.
- Scalability: Azure Functions automatically scale based on demand. Whether the site gets ten visits or ten thousand, the backend can handle the load without any manual intervention.
- Low Operational Overhead: Being "serverless" means I don't have to manage virtual machines, operating systems, or patches. This allows me to focus purely on the application logic, which is a more efficient use of development time.
Deployment and Data Workflow:
1. Frontend Request and Delivery
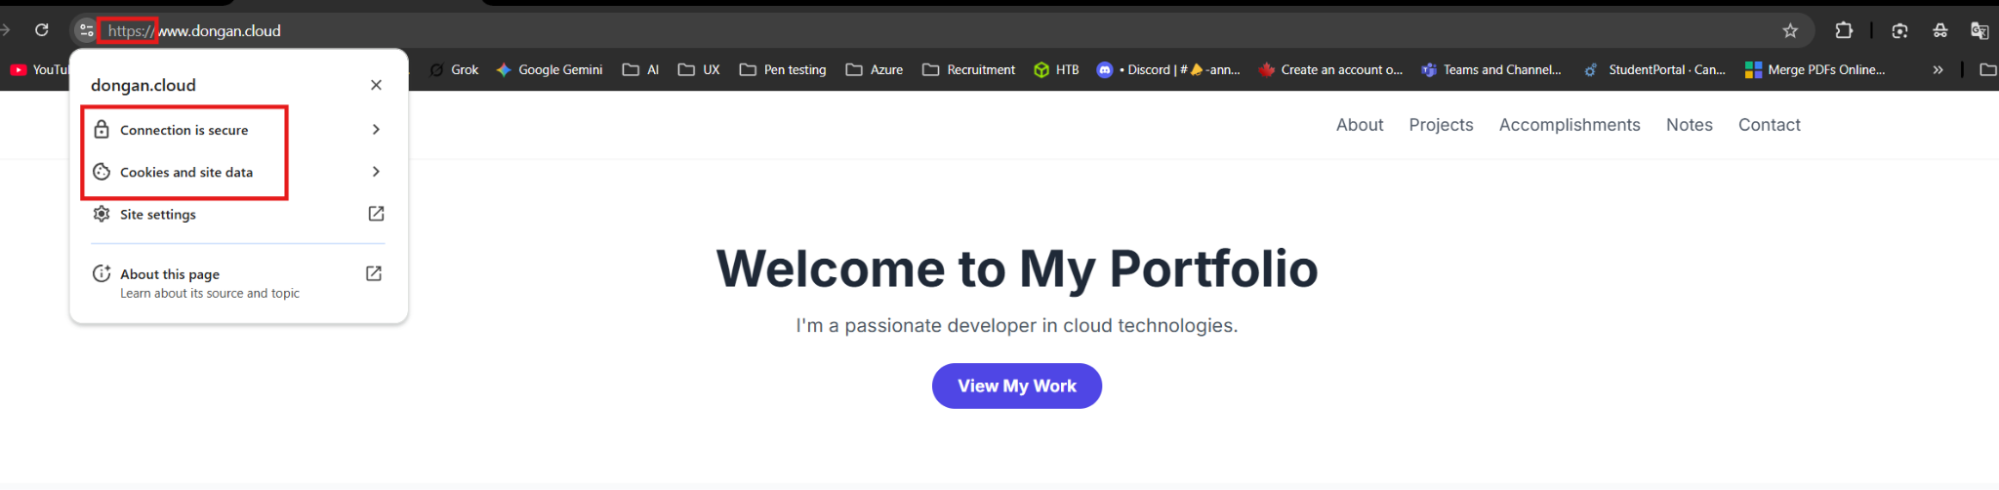
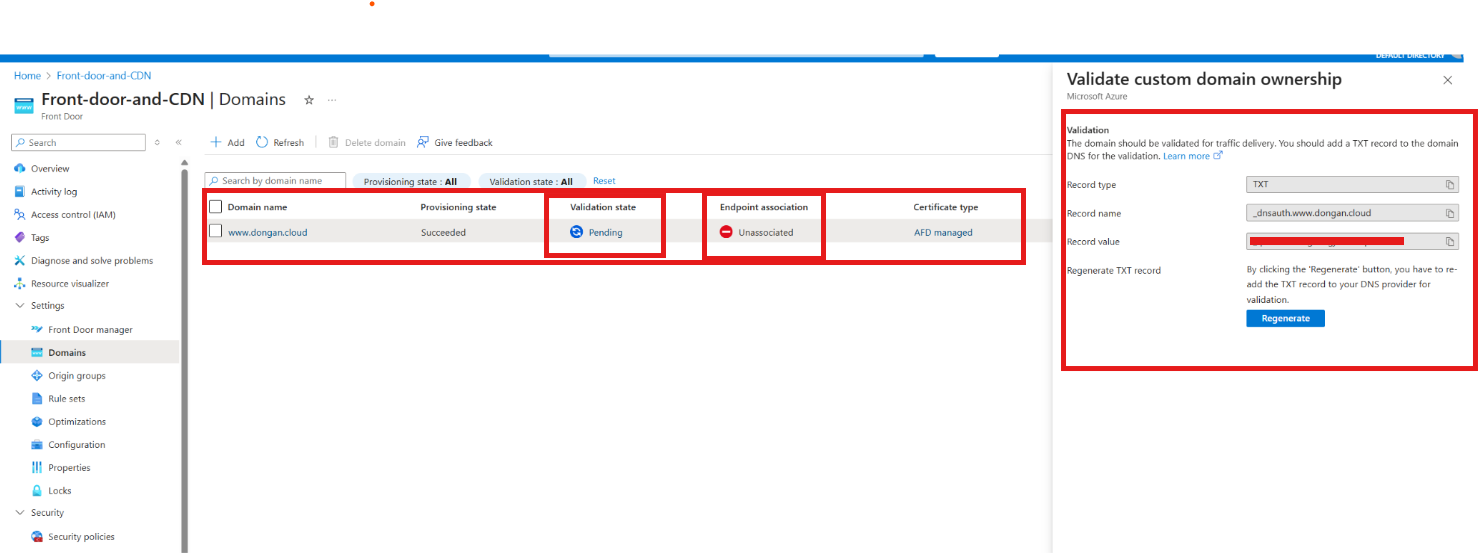
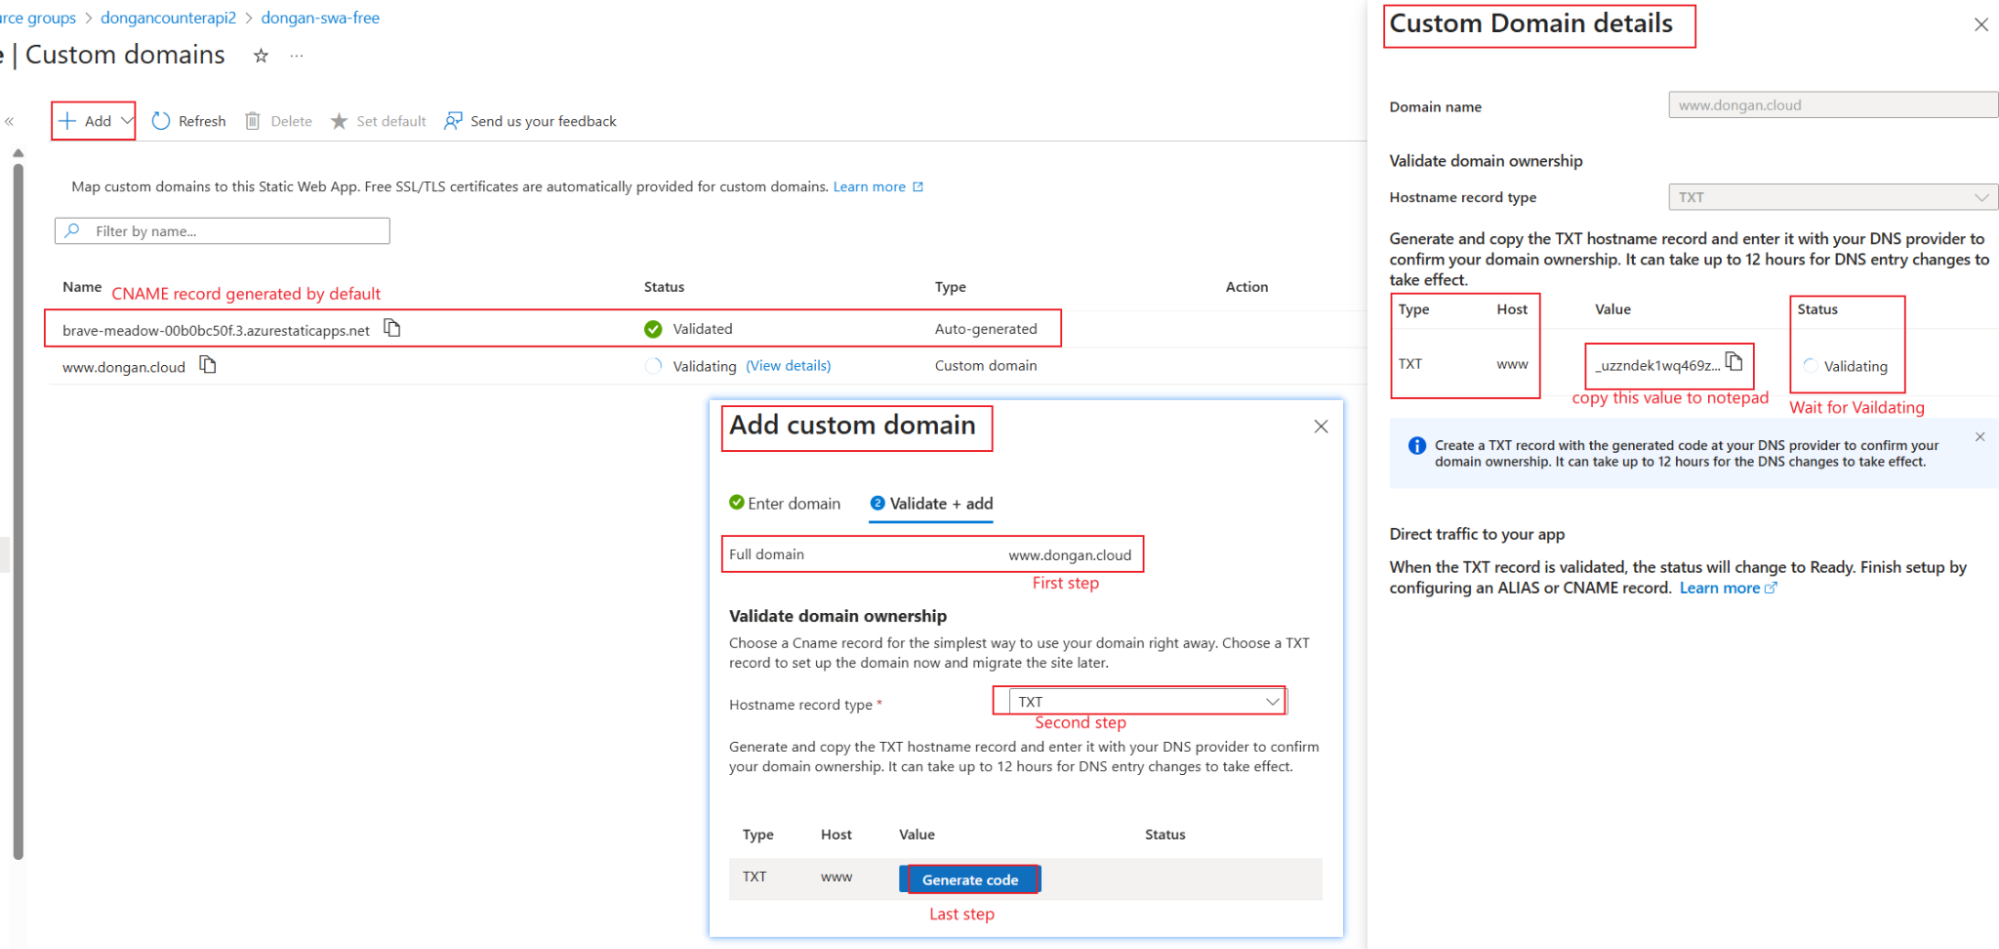
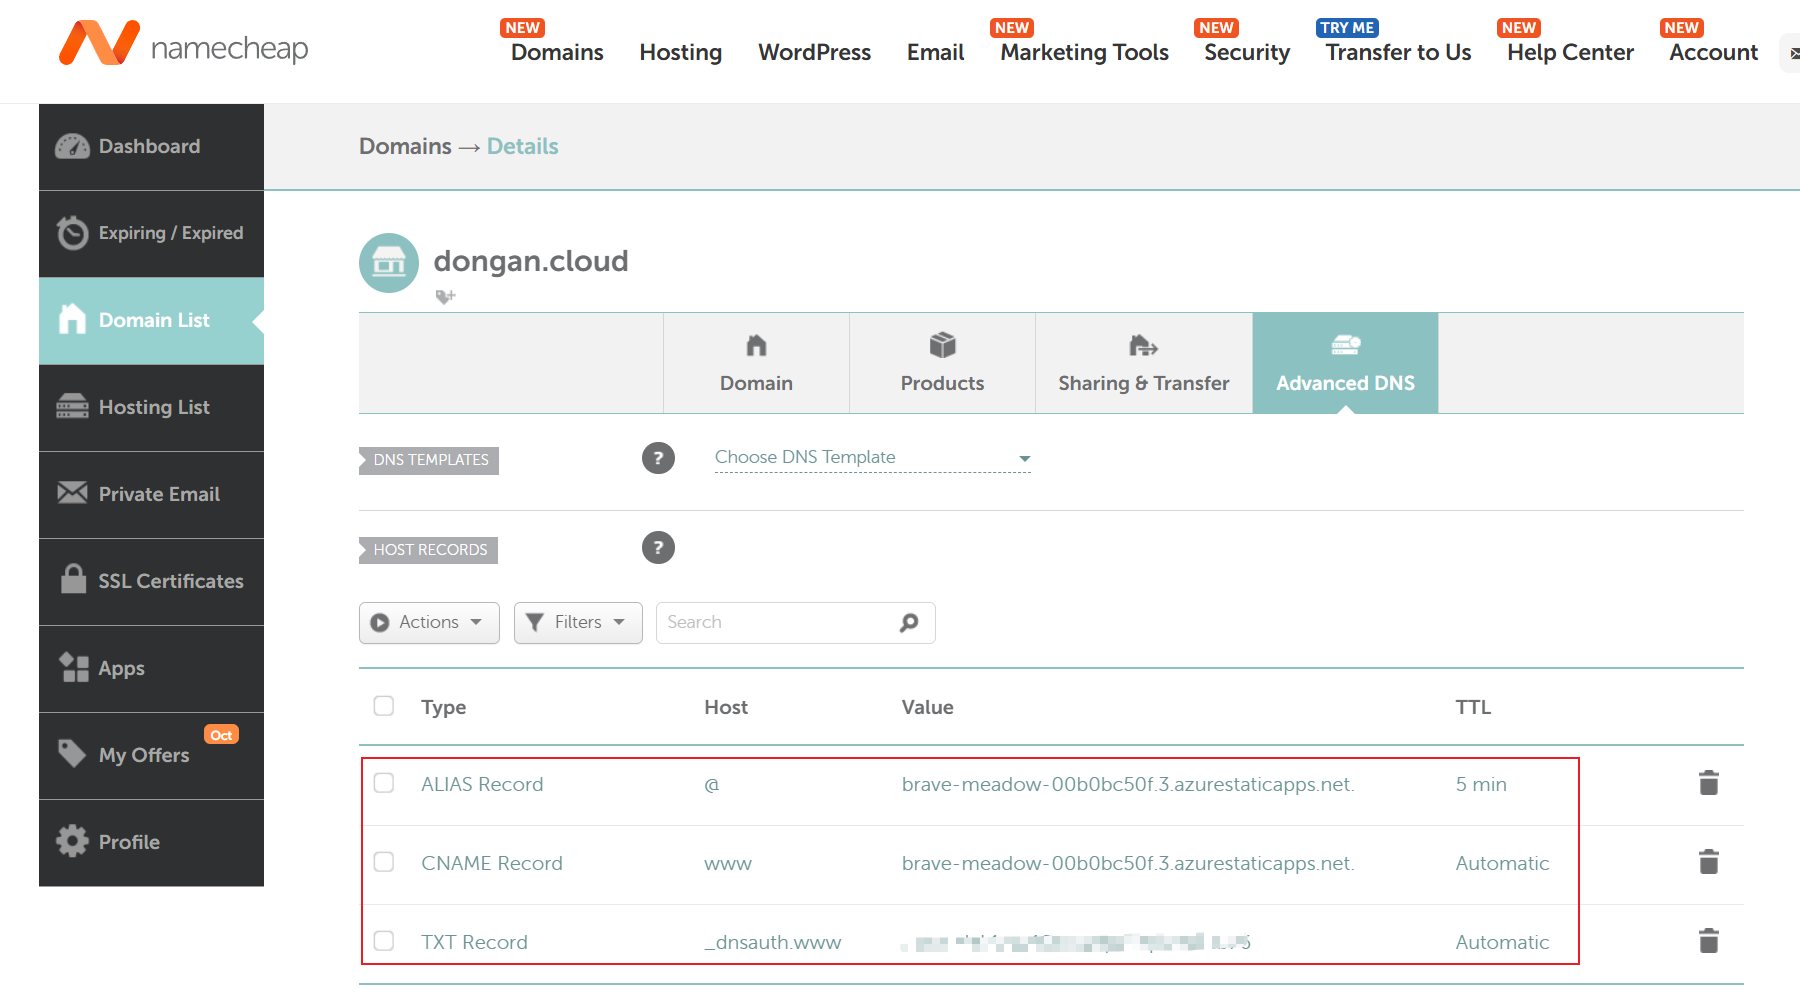
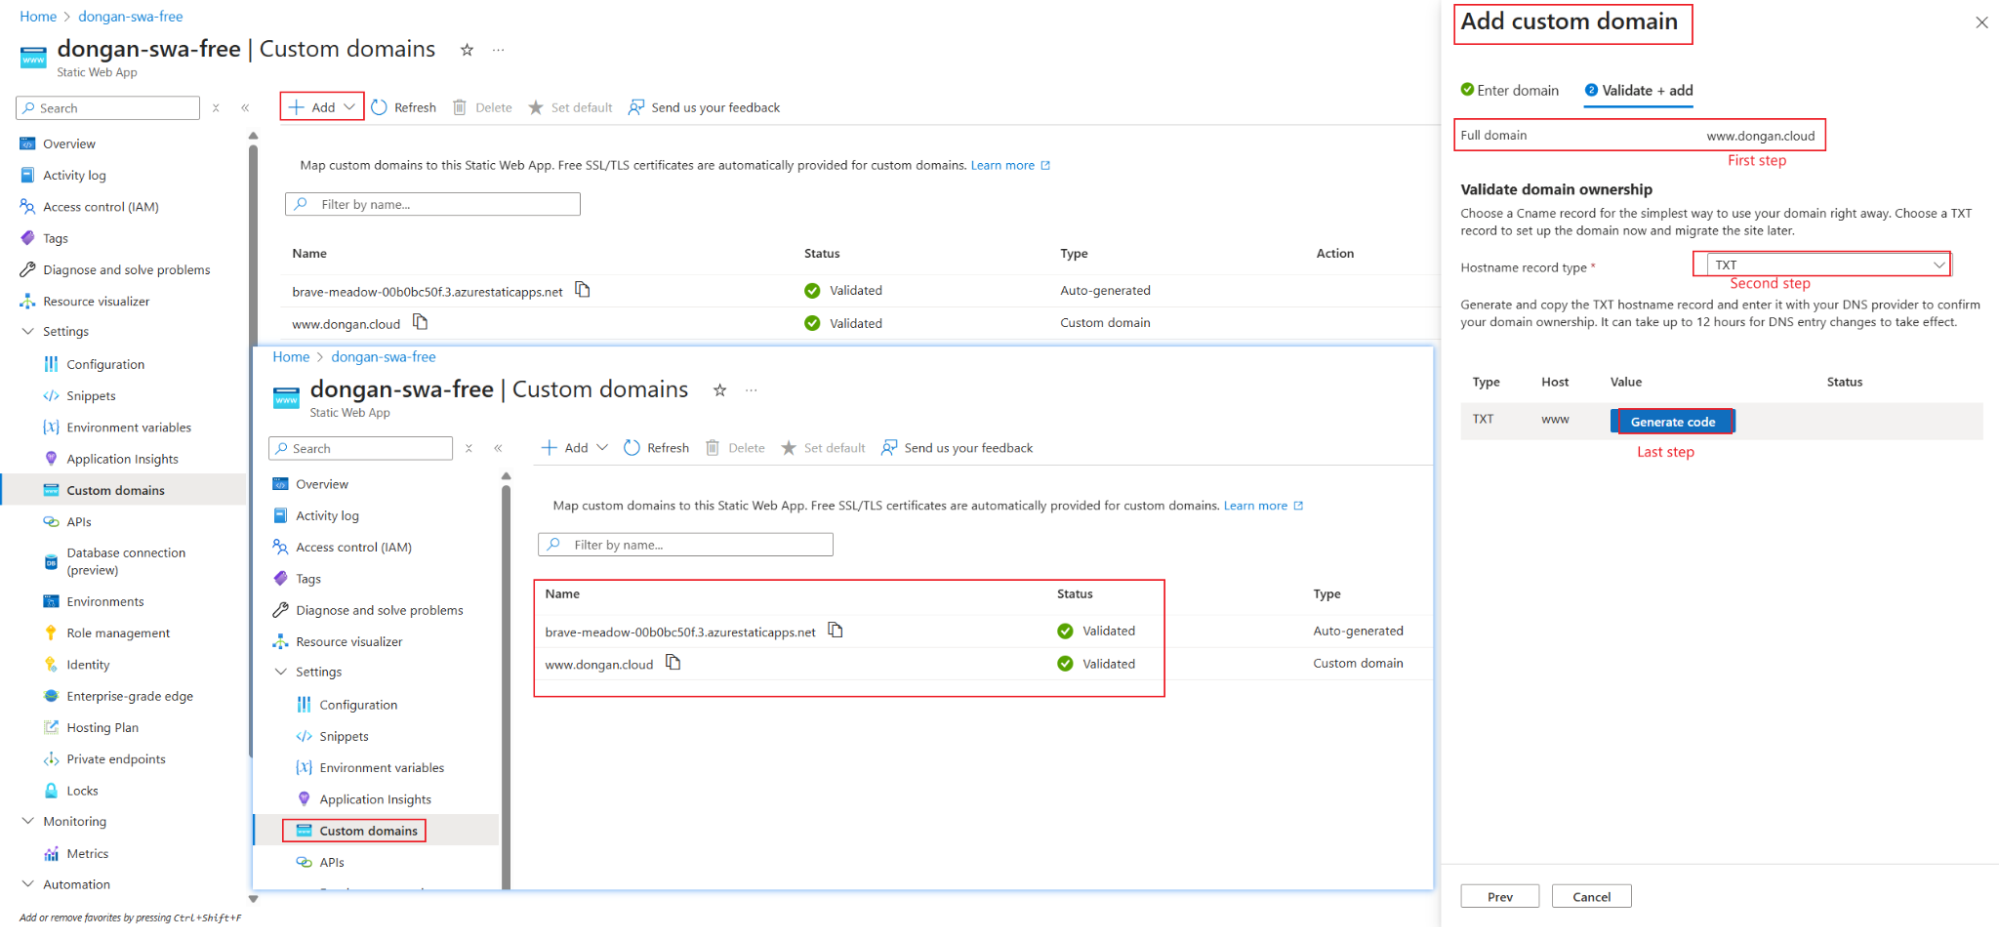
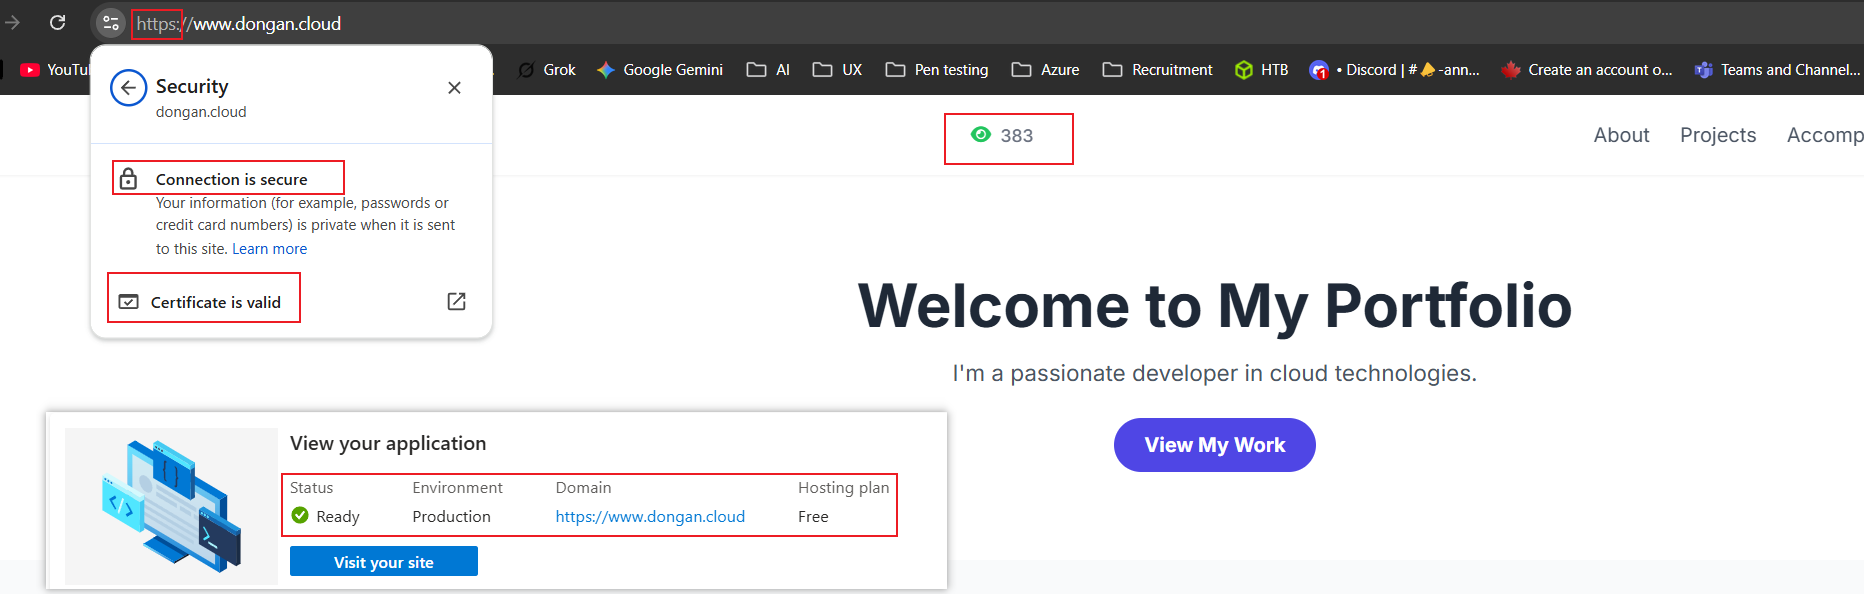
- User Visit: A user navigates to my website,
https://www.dongan.cloud.
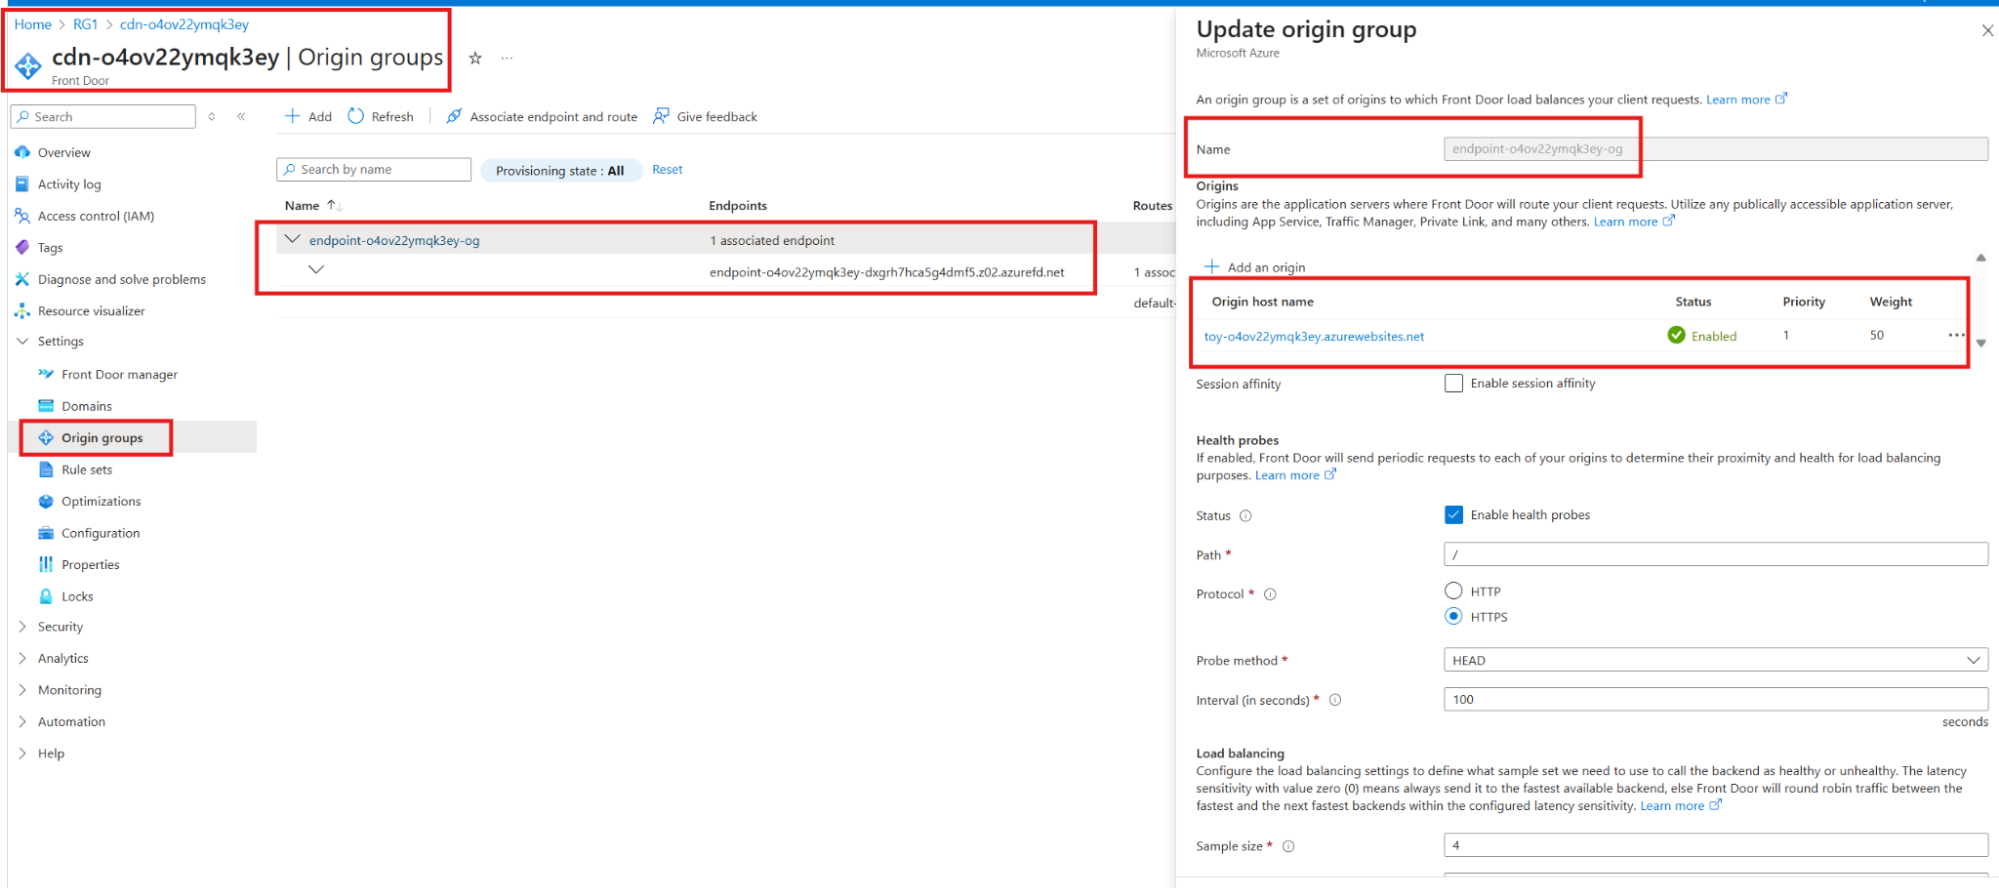
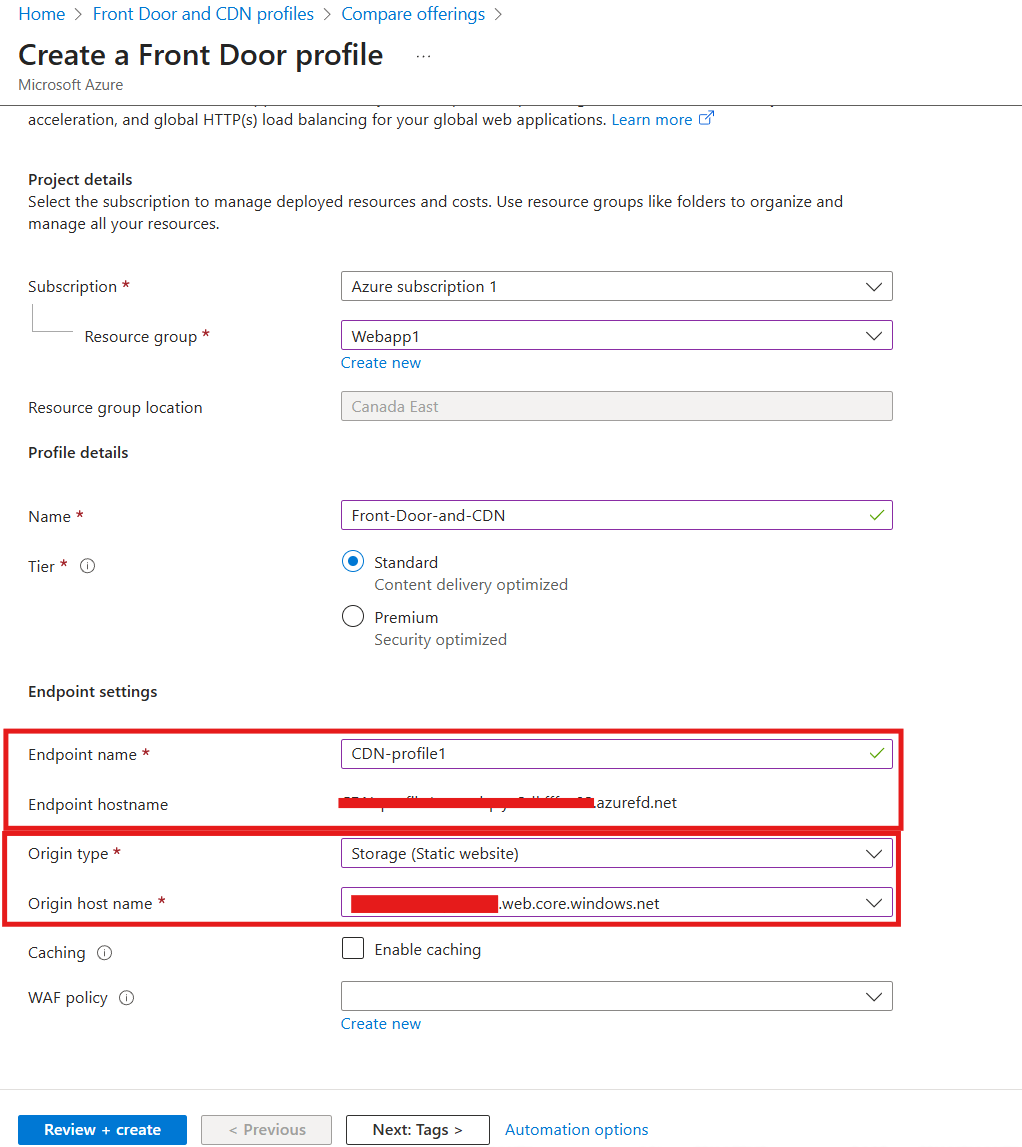
- CDN Delivery: The initial request is handled by Azure Front Door (AFD), which acts as the global CDN. AFD serves the static assets (HTML, CSS, JavaScript) from the lowest-latency edge location to the user. These static files are stored securely and inexpensively in Azure Blob Storage.
- Client-Side API Call: Once the page loads in the user's browser, the JavaScript
fetch client is triggered. It makes an asynchronous POST request to the backend API endpoint to get the visitor count.
2. Backend API Processing
This is where the serverless components take over.
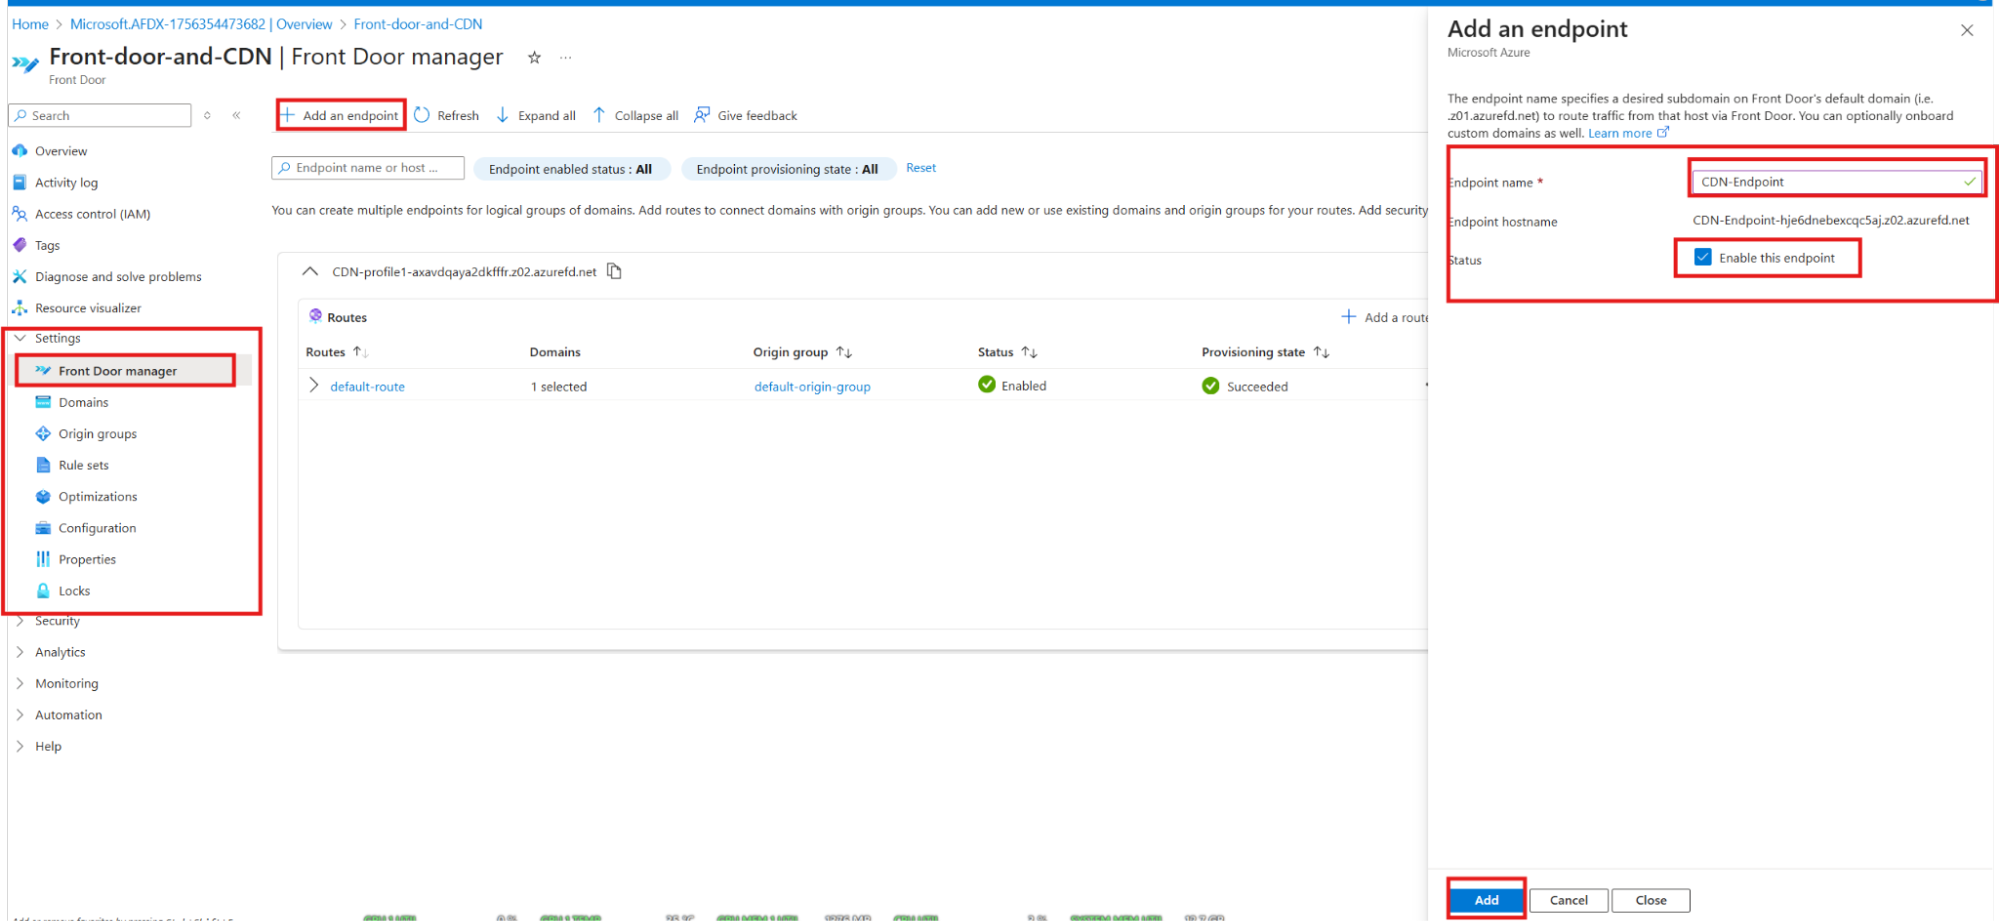
- Request Routing: The API call from the browser (
.../api/ViewCounter) is routed by Azure Front Door to the Azure Function App. In this architecture, the combination of AFD for routing and the function's own HTTP trigger serves the role of a lightweight, effective API gateway.
- Function Execution: The HTTP request triggers the
ViewCounter Azure Function. This is the core of the backend logic.
- Database Interaction: The Node.js code within the function securely connects to Azure Cosmos DB using environment variables for the endpoint and primary key. It reads the current count from a document, increments the value by one, and writes the new value back.
- Response Generation: The function receives the updated count from Cosmos DB.
- Returning the Response: The function packages the new count into a JSON object and sends it back through the same chain: from the Function App, through Azure Front Door, and finally to the user's browser.
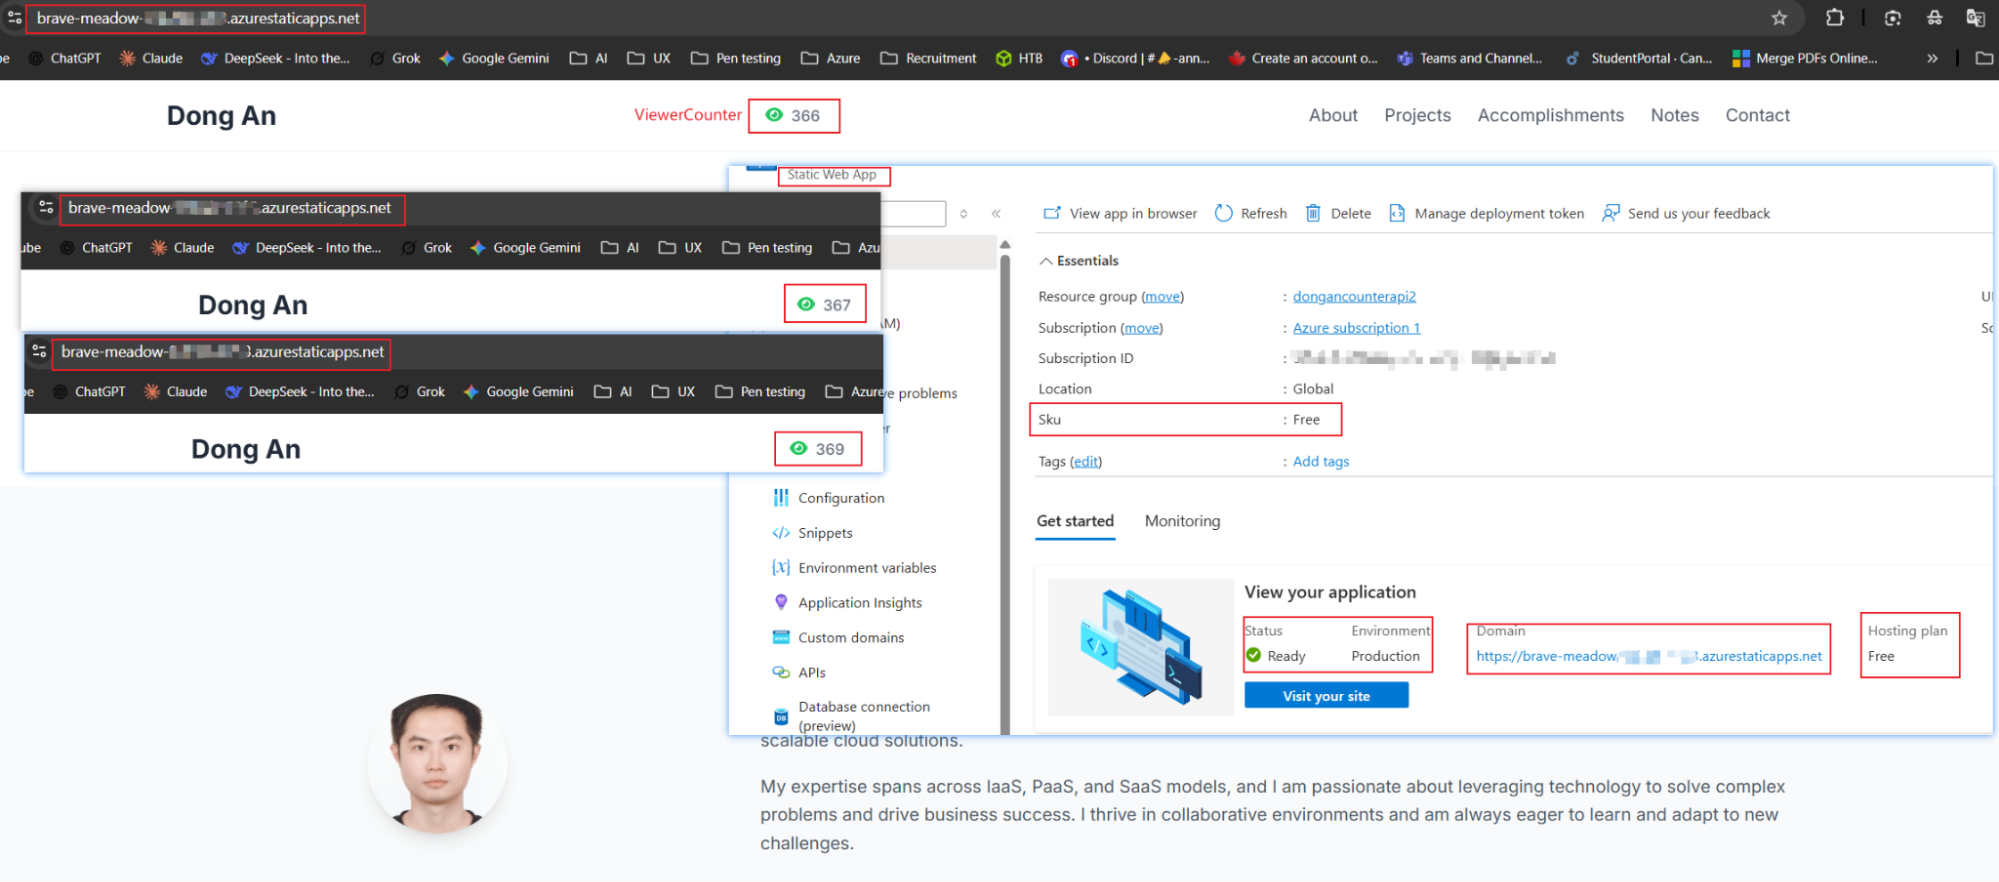
- Dynamic Update: The website's JavaScript receives the JSON response and dynamically updates the counter element in the HTML, completing the workflow.
Serverless Web Application Data Flow:
- User Request: A user opens their browser and navigates to your website.
- Frontend Delivery: The request first hits Azure Front Door, which acts as the CDN. Front Door delivers the static frontend (your HTML, CSS, and JavaScript files) to the user's browser. These files are pulled from Azure Blob Storage.
- API Call: The frontend (running in the user's browser) needs to perform a dynamic action, like submitting a form or fetching data. It makes an API call to a specific endpoint (e.g., /api/submitForm).
- API Gateway Routing: The API Gateway receives this incoming request. Its job is to validate the request and route it to the correct piece of backend logic.
- Backend Logic Execution: The API Gateway triggers the appropriate Azure Function. The function contains the server-side code to process the request (e.g., save the form data).
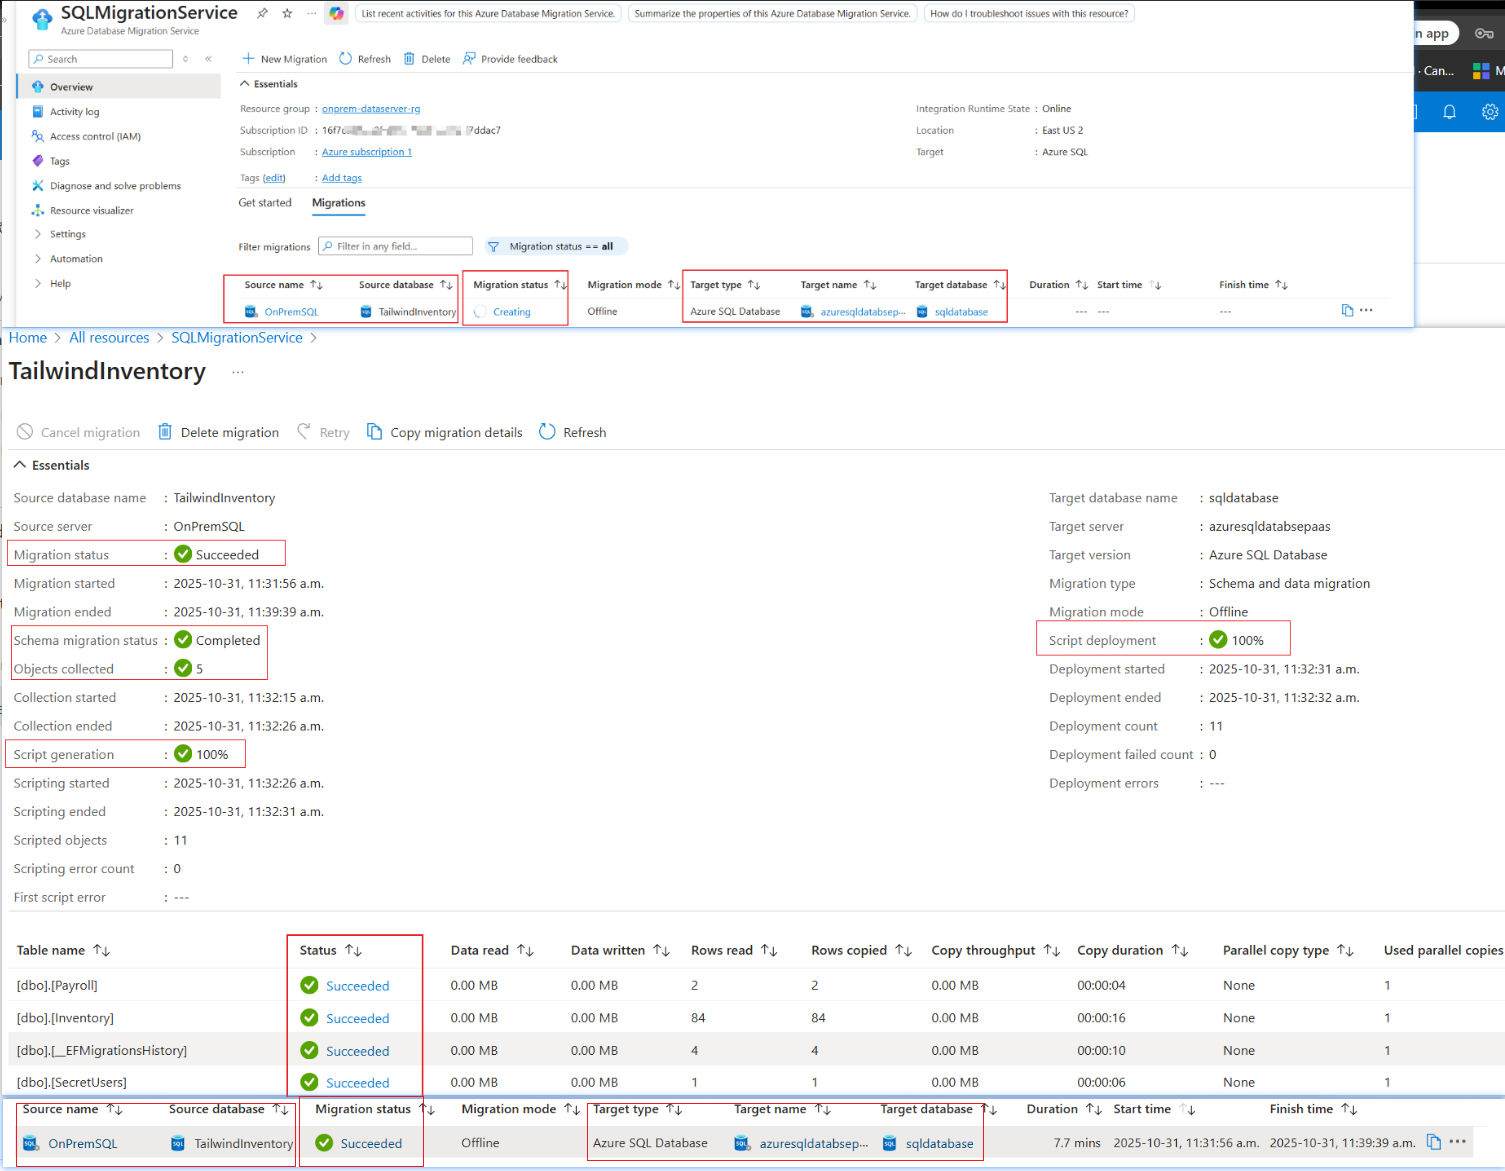
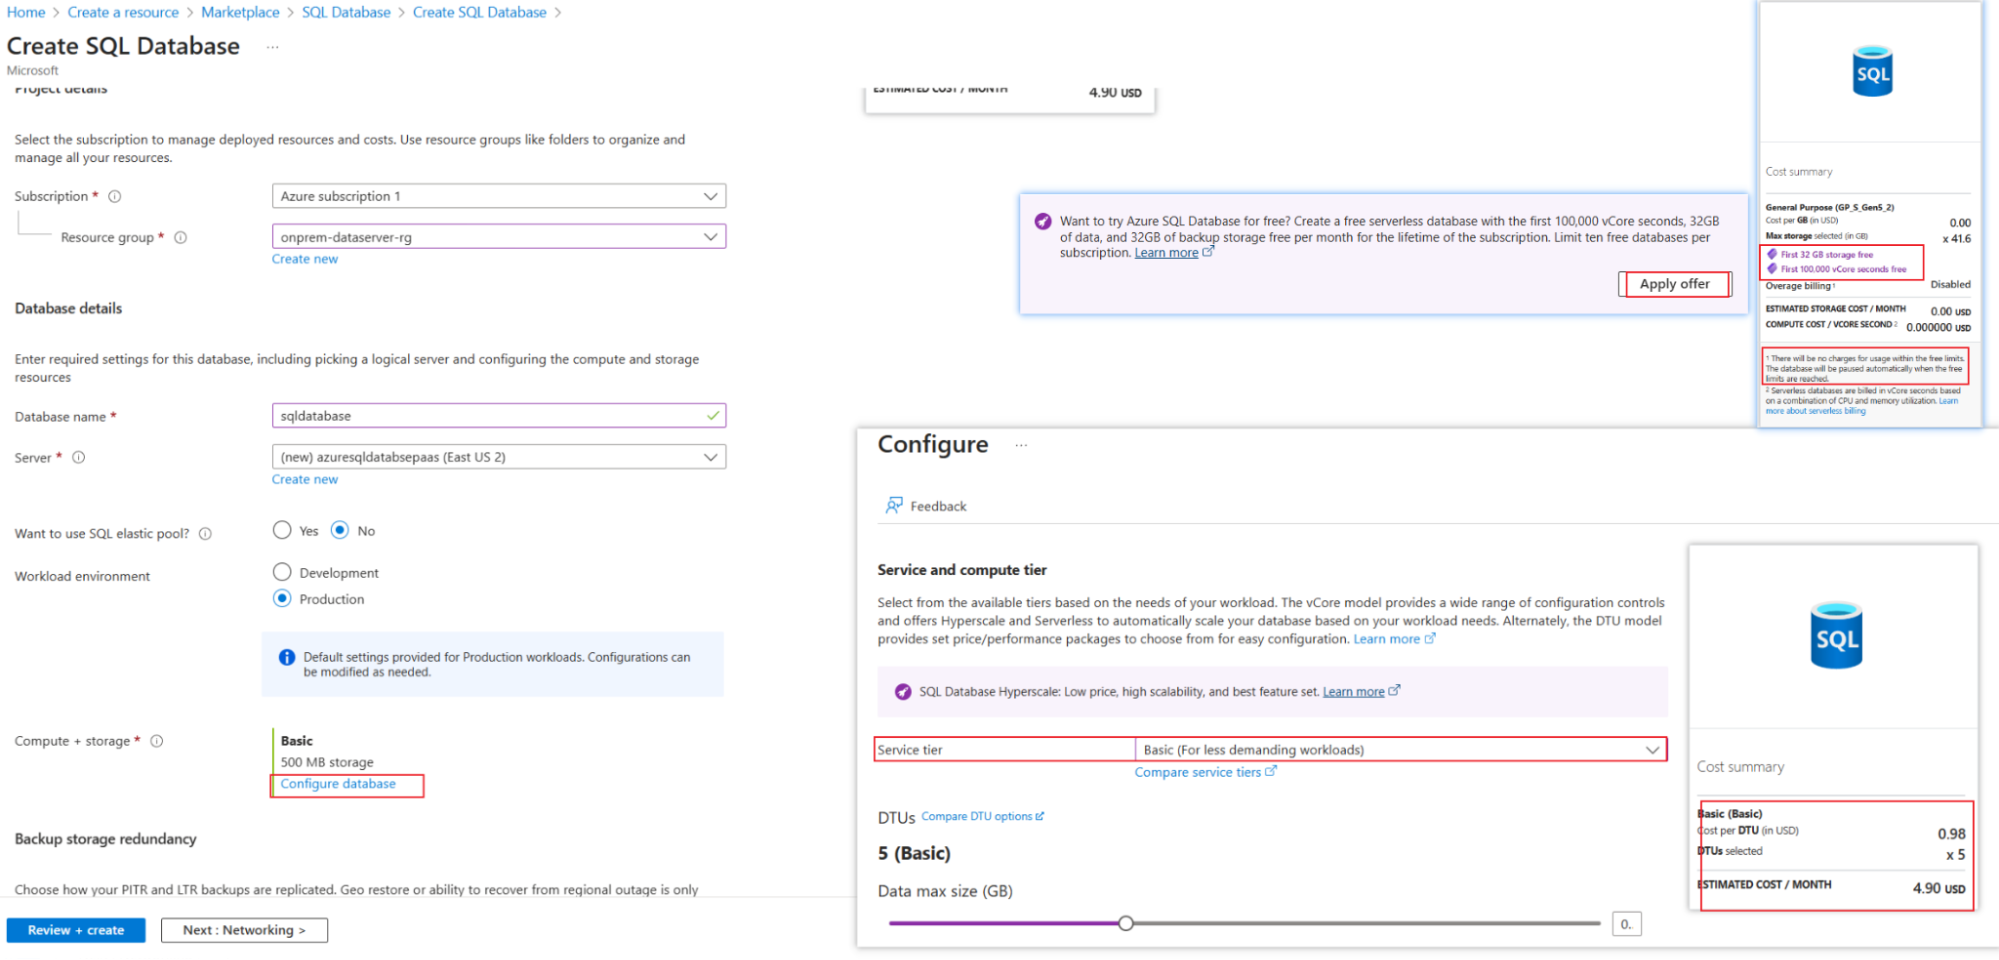
- Database Interaction: The Azure Function connects to a managed database like Azure Cosmos DB or Azure SQL Database Serverless to read/write the necessary information.
- Response: The function completes its task and sends a response (e.g., a success message) back through the same chain: to the API Gateway, then to the frontend, and finally displayed to the user.